

In today’s ever-evolving technological landscape, data takes center stage like never before. The need to efficiently store and manage this invaluable resource has never been more pressing. Snowflake, a cloud-based data platform with an architecture that seamlessly combines elegance and power. Snowflake offers not just data storage but mind-boggling analytics capabilities.
What is Snowflakes?
Snowflake is more than just a platform, it’s a cloud-based data warehousing powerhouse. This platform offers scalable and secure data storage and analytics capabilities that are second to none. Its distinction lies in its unique architecture, which elegantly separates storage, compute, and services layers. This separation provides a level of flexibility and cost-effectiveness that’s a game-changer in the world of data.
Why Snowflake with Django?
You might wonder, why pair Snowflake with Django? Well, here are some compelling reasons:
- Scalable Data Storage: Snowflake’s storage architecture is tailor-made for efficiently handling vast amounts of data, no matter how massive.
- Advanced Analytics: Leverage Snowflake’s SQL capabilities to perform intricate analytics and data processing, opening up a world of possibilities.
- Real-time Data: Keep your Django application up-to-date with access to real-time data, ensuring your content remains dynamic and relevant.
- Data Warehousing: Snowflake can serve as the central data warehousing solution for your Django projects, streamlining your data management processes.
Getting Started with Snowflake
Step 1: Creating a Snowflake Account
As a prerequisite, you’ll need a Snowflake account, which you can create by visiting Snowflake’s official website . Once you’ve successfully created your account and logged in, navigate to the “Databases” section within the “Data” category on the sidebar. Click the “New Database” button at the top right, and give it a name – let’s call it “DJANGO_Project” (or any name of your choice). We’ll connect this database to our Django application in a later step.
Step 2: Setting up Your Django Project with Snowflake
Now, let’s get your Django project rolling with Snowflake. Open your terminal and execute the following commands:
|
1 2 3 4 5 6 7 8 |
mkdir YourProjectName && cd YourProjectName python -m venv env env\Scripts\activate pip install django pip install django-snowflake django-admin startproject YourProjectName . python manage.py startapp your_app_name |
If everything worked correctly then your Django Project Directory will look like this.
|
1 2 3 4 5 6 7 8 9 10 11 12 13 14 15 16 17 |
project_name/ │ ├── manage.py ├── project_name/ │ ├── __init__.py │ ├── asgi.py │ ├── settings.py │ ├── urls.py │ └── wsgi.py │ └── your_app_name/ ├── __init__.py ├── admin.py ├── apps.py ├── models.py ├── tests.py ├── views.py |
Note : Add your created app in INSTALLED_APPS list which can be found in project settings.py. In my case the app name is snowflakeapp
|
1 2 3 4 5 6 7 8 9 10 11 12 13 14 15 16 17 |
INSTALLED_APPS = [ "django.contrib.admin", "django.contrib.auth", "django.contrib.contenttypes", "django.contrib.sessions", "django.contrib.messages", "django.contrib.staticfiles", "snowflakeapp", ] |
Step 3: Configuring Django Settings
In your project’s settings.py file, scroll down to the DATABASES dictionary. Initially, it should look something like this:
|
1 2 3 4 5 6 |
DATABASES = { 'default': { 'ENGINE': 'django.db.backends.sqlite3', 'NAME': BASE_DIR / 'db.sqlite3', } } |
To make Snowflake your default database, modify it as follows:
|
1 2 3 4 5 6 7 8 9 10 11 12 |
DATABASES = { 'default': { 'ENGINE': 'django_snowflake', 'NAME': 'DJANGO_DB', 'SCHEMA': 'PUBLIC', 'WAREHOUSE': 'COMPUTE_WH', 'USER': 'YOUR_USERNAME', 'PASSWORD': 'YOUR_PASSWORD', 'ACCOUNT': 'YOUR_ACCOUNT_IDENTIFIER', 'OPTIONS': {}, } } |
- ENGINE: The ‘ENGINE’ setting specifies the database engine that Django should use to interact with the database. In this case, it is set to ‘django_snowflake’, indicating that Django will use the Snowflake database engine.
- NAME: The ‘NAME’ setting specifies the name of the Snowflake database you want to connect to. In this example, it is set to ‘DJANGO_DB’.
- SCHEMA: The ‘SCHEMA’ setting specifies the Snowflake schema within the specified database. A schema is a container for database objects like tables, views, and stored procedures. In this case, it is set to ‘PUBLIC’, which is a common default schema in Snowflake.
- WAREHOUSE: The ‘WAREHOUSE’ setting specifies the Snowflake virtual warehouse to use for executing queries and managing resources. A virtual warehouse is a collection of compute resources that can be allocated to perform various tasks. Here, it is set to ‘COMPUTE_WH’, which is the name of the virtual warehouse to be used.
- USER’: The ‘USER’ setting specifies the username to use for authenticating and connecting to the Snowflake database. You should replace ‘YOUR_USERNAME’** with the actual username you use to access Snowflake.
- ‘PASSWORD’: The ‘PASSWORD’ setting specifies the password associated with the specified username. You should replace ‘YOUR_PASSWORD’** with the actual password for the provided username.
- ‘ACCOUNT’: ‘YOUR_ACCOUNT_IDENTIFIER’: The ‘ACCOUNT’ setting specifies the Snowflake account identifier, which is the unique identifier for your Snowflake account. This identifier is used to route your database requests to the correct Snowflake account in a multi-tenant environment. You should replace ‘YOUR_ACCOUNT_IDENTIFIER’** with your actual Snowflake account identifier.
- ‘OPTIONS’: The ‘OPTIONS’ setting is a dictionary that can be used to specify additional database connection options if needed. In this example, it’s left empty, but you can add options as key-value pairs if required for your specific use case.
**it may be tempting to include sensitive data directly in your code for the sake of simplicity in demonstrations, it’s imperative to avoid this practice in production environments. Instead, utilize environment variables or other secure configuration management techniques to protect your data and ensure the security and integrity of your applications
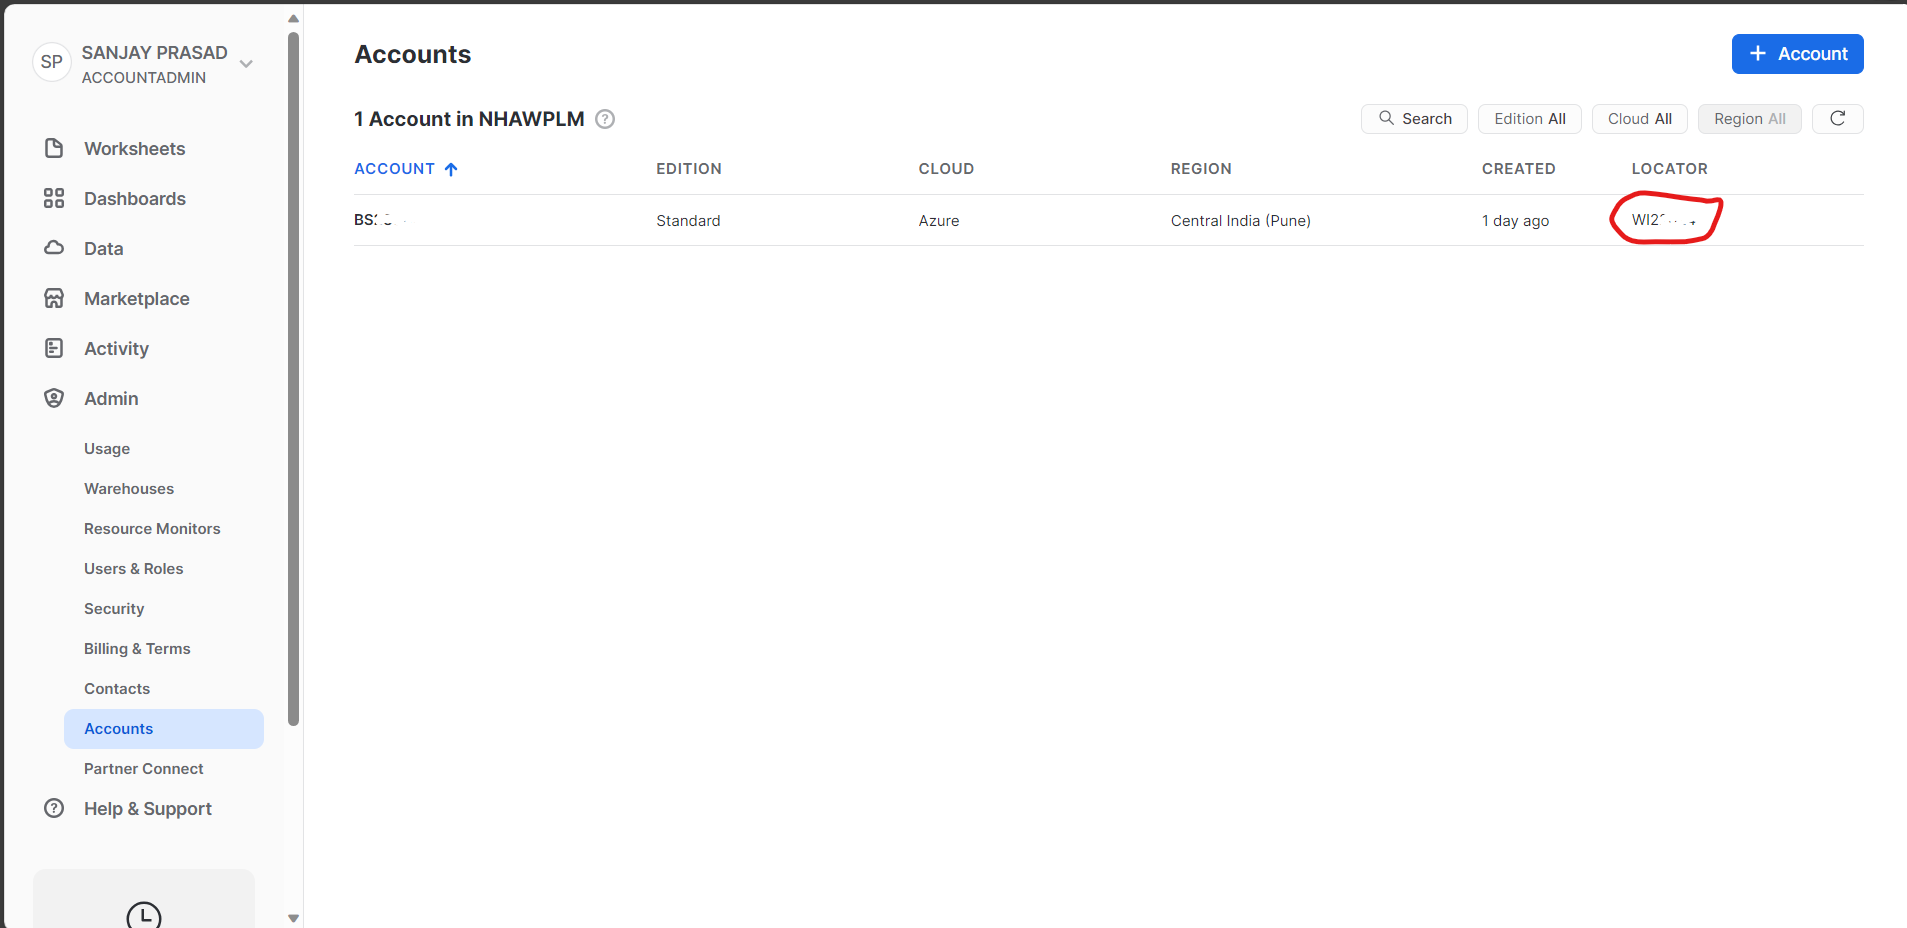
For now we will mostly use the default configuration for SCHEMA and WAREHOUSE and the Account identifier can be find under Admin>Accounts>Locator
With this configuration, you’re all set to harness the immense power of Snowflake within your Django project.
Database Migration
For explanation I have created a basic model to execute some basic queries to verify whether the connection is successfully configured or not.
|
1 2 3 4 5 |
class SnowflakeData(models.Model): name = models.CharField(max_length=100) value = models.IntegerField() |
Now, all our things are correctly set up and to finalize the process we need to migrate the database, and to do so we have to give the following commands.
|
1 2 |
python manage.py makemigrations python manage.py migrate |
giving above commands it will result in creation of tables in snowflakes which can be verified by looking them under the correct database and schema

Using Snowflake in Django
For Demonstration Purpose I will execute a sample command from Shell to show a basic Operation of adding and retrieving data from the Snowflakes.
As in my case my app name is snowflakeapp
To enter in Django shell
|
1 2 |
python manage.py shell from snowflakesapp.models import SnowflakeData |
To enter the data in the database:
|
1 2 |
>>> SnowflakeData.objects.create(name="alex", value=15) <SnowflakeData: SnowflakeData object (2)> |
To retrieve the data from snowflake database
|
1 2 |
>>> SnowflakeData.objects.all() <QuerySet [<SnowflakeData: SnowflakeData object (1)>, <SnowflakeData: SnowflakeData object (2)>]> |
Project Code Link Github : skprasad117/Django-Snowflake-Demons-tration-Project (github.com)
For more such amazing post Visit : https://blog.bluethinkinc.com/
For more blogs follow me on medium : https://skprasad117.medium.com/


bluethinkinc_blog
2023-10-05