

Magento which is now Adobe Commerce, is an open source e-commerce plateform written in PHP. Magento provide all required functionalities for e-commerce business. Apart from that Magento site owners and users require some of the custom feature to meet their business needs or sometimes it needs to override the default Magento functions as per the business logic and requirements.In these situations Magento developers needs to create module and implement logic based on the business requirements.
In ordre to create custom module, you need to first install Magento 2 either locally or on a development server, that you can add new files to.
If you have not yet installed Magento2, you can follow the steps How to install Magento2 on VmWare Or Ubuntu
We are going to implement this in following steps:
- Step 1: Create Magento 2 Module Structure.
- Step 2: Declaration of Module.
- Step 3: Registration of Module.
- Step 4: Activate the Module.
- Step 5: Add functionality – Create custom page with bnews/index/view.
Let’s ger started:
Step 1 Create Magento2 Module Structure
You can add module in app/code directory or in vendor/magento directory.
Example:
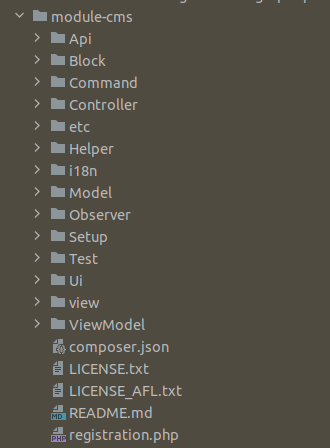
In the above image is showing standard module folder structure which is Magento CMS module.
1. Create the following folders in the magento project directory
app/code/Bluethink/CustomModule
Bluethink is the module’s Vendor name and CustomModule is the Module name.It could be diffrent Name and app/code should be the same.
Note: If you don’t have the code folder, create it manually.
Step 2: Declaration of Module
Declaration of Module is exist in it
app/code/Bluethink/CustomModule/etc/module.xml
It is necessary to create etc folder and add the module.xml file.
Contents would be:
|
1 2 3 4 5 6 7 8 9 |
<?xml version="1.0"?> <config xmlns:xsi="http://www.w3.org/2001/XMLSchema-instance" xsi:noNamespaceSchemaLocation="urn:magento:framework:Module/etc/module.xsd"> <module name="Bluethink_CustomModule" > <sequence> <module name="Magento_Directory"/> <module name="Magento_Config"/> </sequence> </module> </config> |
Explanation:
xmlns:xsi:http://www.w3.org/2001/XMLSchema-instance —Declared in the XML and is used to help declare that the XML document is an instance of and XSD. The convention is to use the namespace prefix of xsi. targetNamespace: is used in the header of the XSD to defined the namespace that the XSD describes.
Module.xsd file describe Naming convention of module attribute, sequence, and setup version (schema version).
Visit:vendor/magento/framework/Module/etc/module.xsd to all about attribute of module.xml file.
Module attribute : define the name of module.
Sequence attribute : Module written in sequence attribute triggers serial wise before parent module.
Step 3: Registration of Module
To register the module, create a registration.php file in the
app/code/Bluethink/CustomModule/registration.php
Contents would be:
|
1 2 3 4 5 6 |
<?php \Magento\Framework\Component\ComponentRegistrar::register( \Magento\Framework\Component\ComponentRegistrar::MODULE, 'Bluethink_CustomModule', __DIR__ ); |
Explanation:
There is called register method with three arguments from ComponentRegistrar class.
Visit: vendor/magento/framework/Component/ComponentRegistrar.php
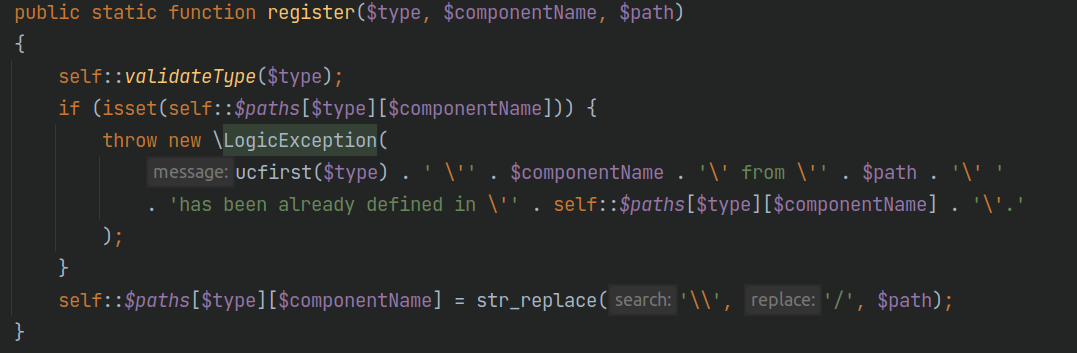
Type : ComponentRegistrar class register five type of component in Magento by using register method. Name of the component given below Module, Theme, Language, Setup, and Library.
ComponentName: it will be the name of the component. In the above example given the name of the module – Bluethink_CustomModule.
Path: Third argument __DIR__ is a magic method of PHP. It will be return the path of the file.
Step 4 : Activate the module
Now its time to enable our moule. Lets check the status of our module by typing below command in the magento project root directory.
php bin/magento module:status
You can see Bluethink_CustomModule is disable now.
So lets run the command to enable our module:
php bin/magento module:enable Bluethink_CustomModule
Now that you have enabled the module first time, so you have to upgrade the database of the module by using this command line:
php bin/magento setup:upgrade
Step 5 Add functionalities – Create custom page with “bnews/index/view”
In Magento url is represented by frontname/controllerPath/action.So in this case
bnews is frontname, index is controllerPath, and view is action.
Final URL: http:
The front name as bnews in the router file will be used to access the module through the URL.
Step 5.1 Create routes.xml in it
app/code/Bluethink/CustomModule/etc/frontend/routes.xml
folder “frontend” is used to create route for storefront and for the admin route we need to create routes.xml under adminhtml. We will learn about the admin routes later.
Contents would be:
|
1 2 3 4 5 6 7 8 |
<?xml version="1.0" ?> <config xmlns:xsi="http://www.w3.org/2001/XMLSchema-instance" xsi:noNamespaceSchemaLocation="urn:magento:framework:App/etc/routes.xsd"> <router id="standard"> <route frontName="bnews" id="custommodule"> <module name="Bluethink_CustomModule"/> </route> </router> </config> |
Explanation:
routes.xsd file define about all attribute like naming convention of routerID and routerIdType etc.
Visit:vendor/magento/framework/App/etc/routes.xsd
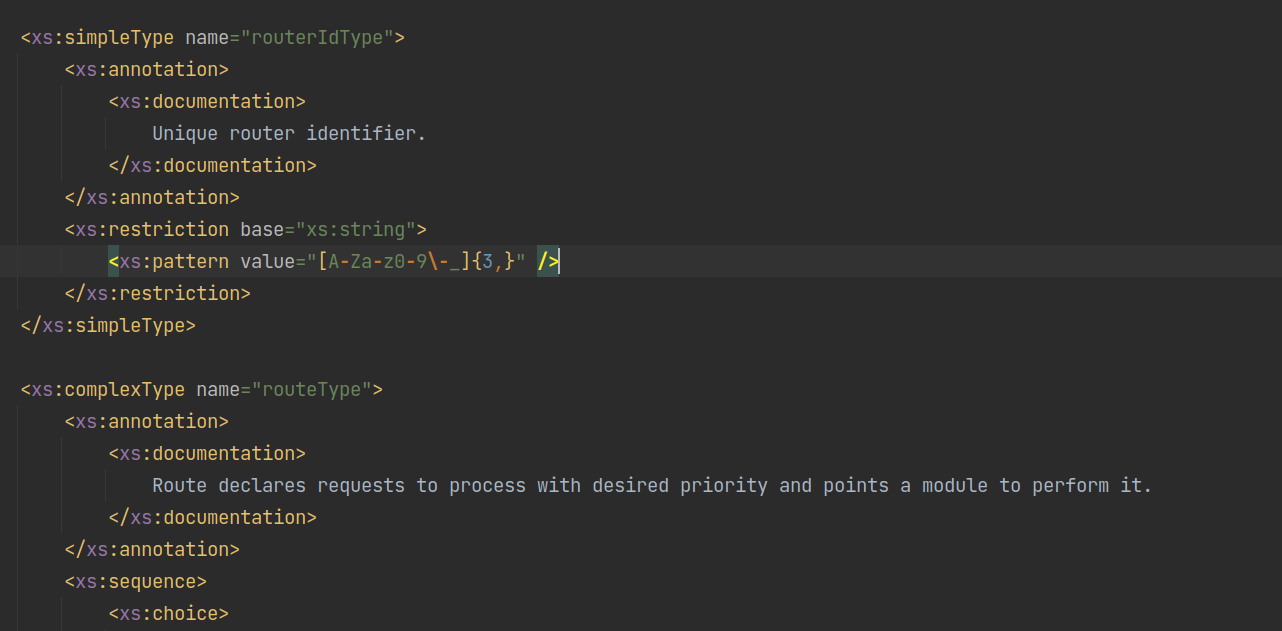
router id: define area of Magento.
Standard: define for storefront (frontend).
admin: define for Magento backend(admin pannel).
route frontName: It is used to access controller action.
route id: It is used to create layout file name.
module attribute : The route will be used for the module given in module attribute.
Step 5.2Create Controller and Action
controller is the folder inside Controller folder. One of the important in Magento system is frontController(Magento\Framework\App\FrontController), it always receives request then route controller, action by route_name Let’s take an example of routing an request:
|
1 2 3 4 5 6 |
foreach ($this->_routerList as $router) { try{ $actionInstance = $router->match($request); } ... } |
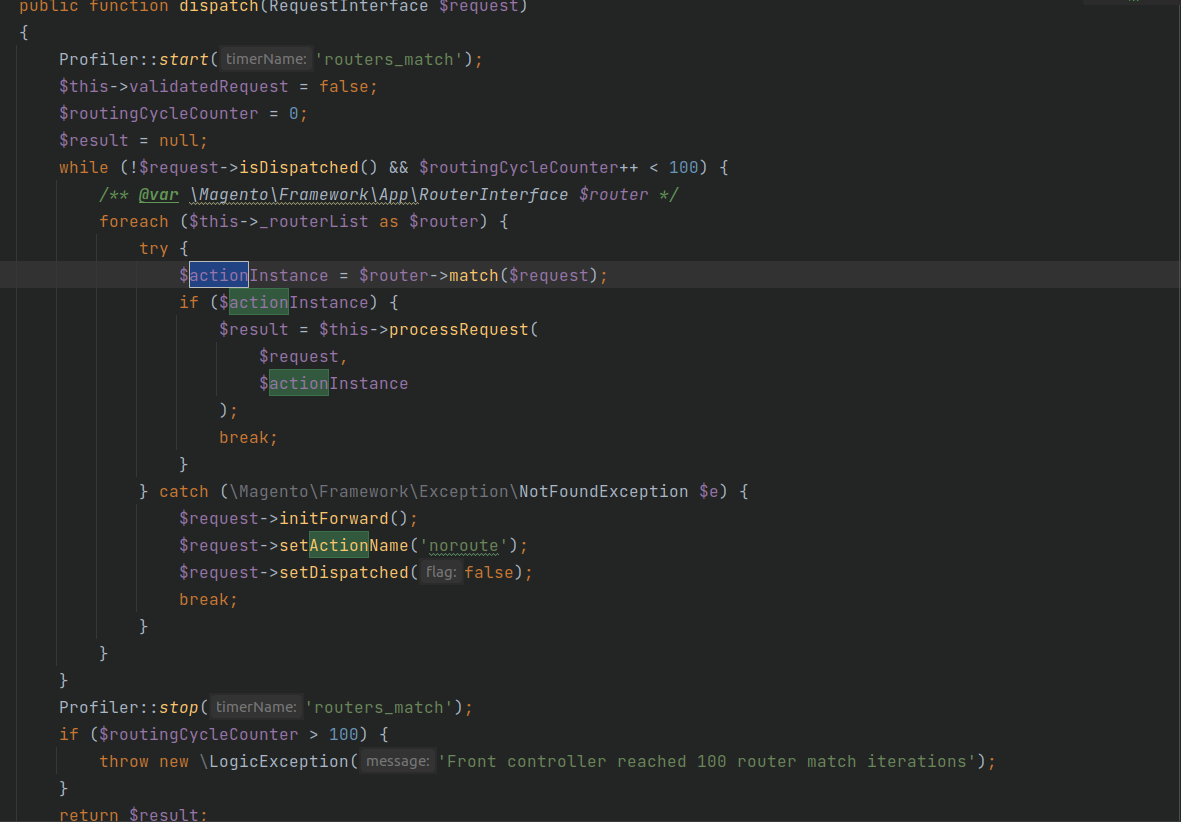
If there is an action of controller class found, execute() method will be run.
Let’s create View Controller class in it
app/code/Bluethink/CustomModule/Controller/Frontend/Index/View.php
Similarly, Frontend is used to storefront and Adminhtml is used for Magento Backend.
Content would be:
|
1 2 3 4 5 6 7 8 9 10 11 12 13 14 15 16 17 18 |
<?php namespace Bluethink\CustomModule\Controller\Index; class View extends \Magento\Framework\App\Action\Action { protected $pageFactory; public function __construct( \Magento\Framework\View\Result\PageFactory $pageFactory) { $this->pageFactory = $pageFactory; } public function execute() { return $this->pageFactory->create(); } } |
Here View class extends abstract class \Magento\Framework\App\Action\Action. Action class helps to take and perform action by controller.
Now, if you mention url http:
When control comes in controller view class, execute method will automatically executed by Magento\Framework\App\FrontController::dispatch() on line $actionInstance->execute();
In this method returning Magento\Framework\View\Result\Page Object, This will trigger layout rendering process.
In Magento2 all controller actions must be return something. Return type is define that which action should be perfome.
Example of Result and instance of:
\Magento\Framework\Controller\Result\Json– returns a json object.
\Magento\Framework\Controller\Result\Raw– returns raw string or text.
\Magento\Framework\View\Result\Page– renders html content.
\Magento\Framework\Controller\Result\Redirect– redirects action to another action.
\Magento\Framework\Controller\Result\Forward– forwards to an other action (internal redirect).
Step 5.3 Create layout Structure for the frontend
Magento gives authority to customize page structure using layoute file which is define under view/{area-path}/layout folder.
The area path can be frontend or adminhtml.The Layout file is a xml file and a major path of view layer in Magento 2 Module.
There is a layout file name default.xml file. This file will be applied all the pages in it’s area.Otherwhile the layout file have following format as:
{router-id}_{controller-name}_{action-name}.xml
Magento will check the layout file to find the handle for the page and then load Block and Template. We will create a layout handle file for this module in it:
app/code/Bluethink/CustomModule/view/frontend/layout/custommodule_index_view.xml
content would be:
|
1 2 3 4 5 6 |
<?xml version="1.0"?> <page xmlns:xsi="http://www.w3.org/2001/XMLSchema-instance" layout="1column" xsi:noNamespaceSchemaLocation="urn:magento:framework:View/Layout/etc/page_configuration.xsd"> <referenceContainer name="content"> <block class="Magento\Framework\View\Element\Template" name="bluethink_custommodule" template="Bluethink_CustomModule::custompage.phtml" /> </referenceContainer> </page> |
Here we can see layout=”1column” in page tag. The layout attribute is decide grid structure of the page. Magento provides below types of layout for frontend:
empty
1column
2columns-left
2columns-right
3columns
and 3 page layout types for the backend (admin-empty, admin-1column, admin-2columns-left).
Above layout is defined in vendor/magento/module-theme/view/frontend/page_layout
An Example of 3columns layout:
In the layout file, we will block and template.
name: it is required attribute and is used to identify block and template
Step 5.4 Create Template page
And to finish this route’s layout, here is our PHTML template, app/code/Bluethink/CustomModule/view/frontend/templates/custompage.phtml:
content is here:-
|
1 2 3 |
<?php echo “Hello world” ?> |
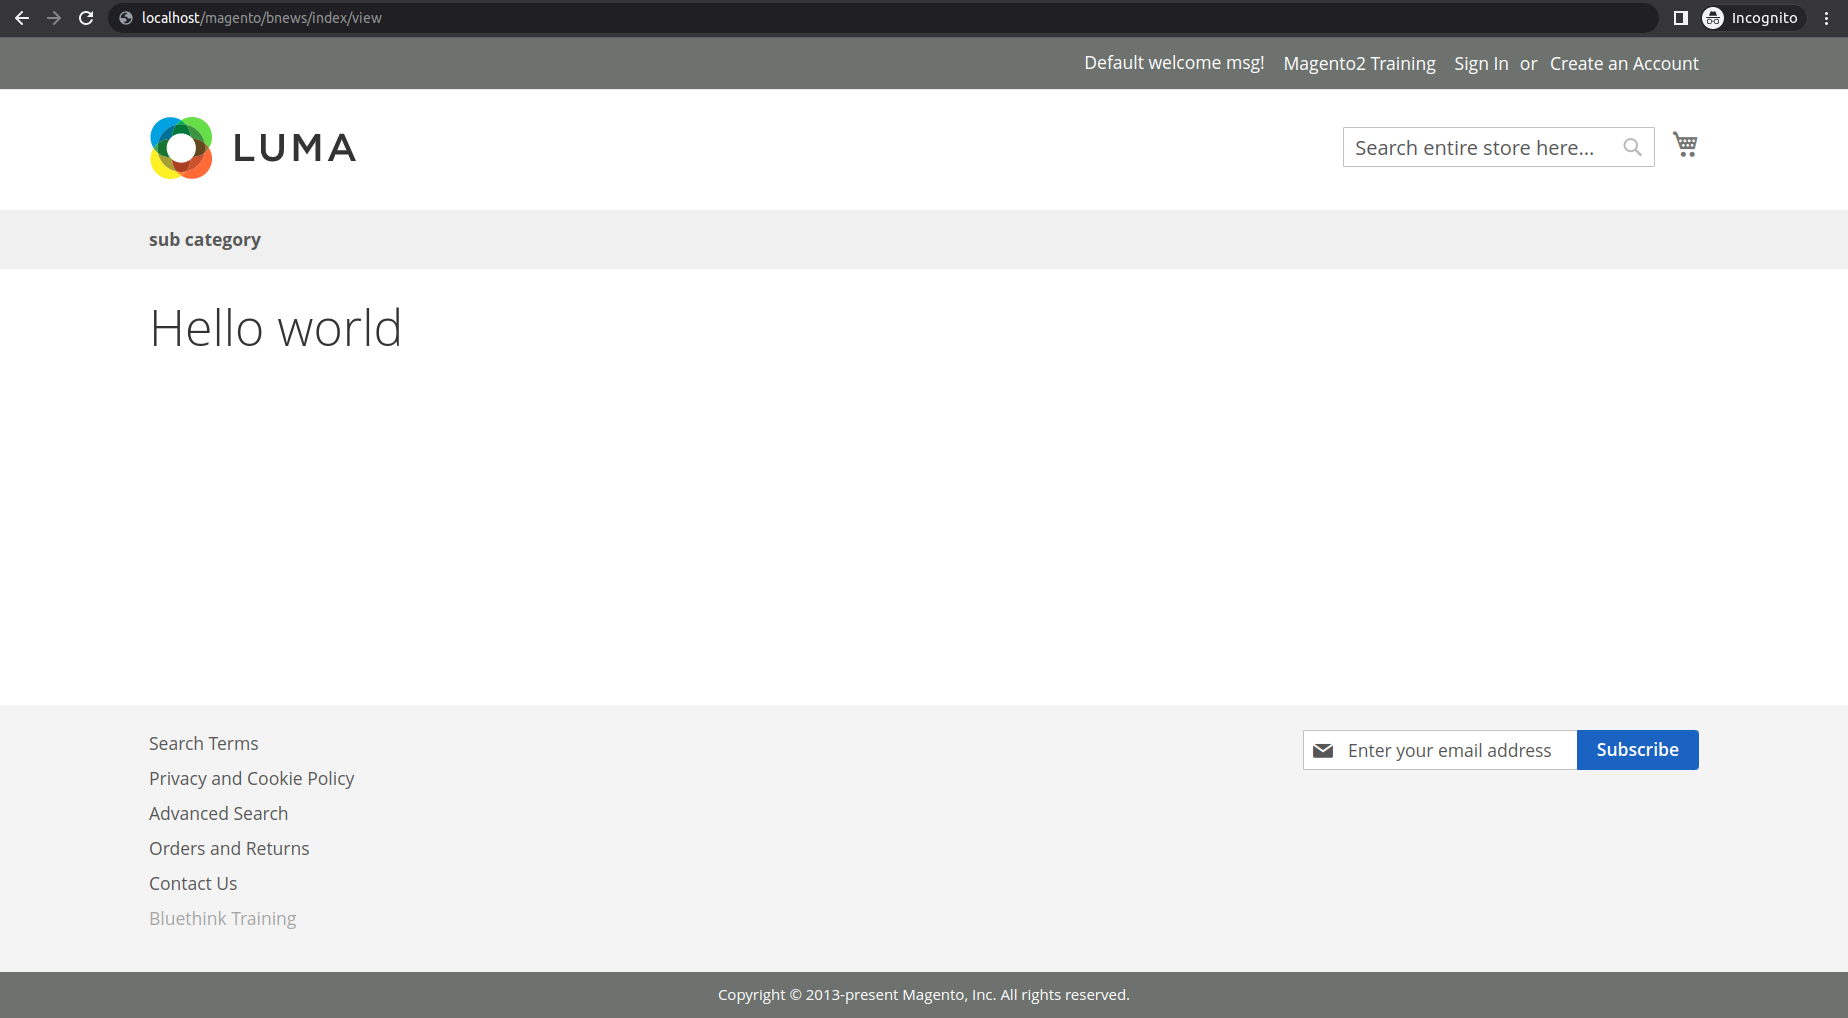
Save the file and please run php bin/magento cache:clean to check result..
Let’s hit the url :
|
1 |
http://<domain.com>/bnews/index/view |


bluethinkinc_blog
2022-11-22