

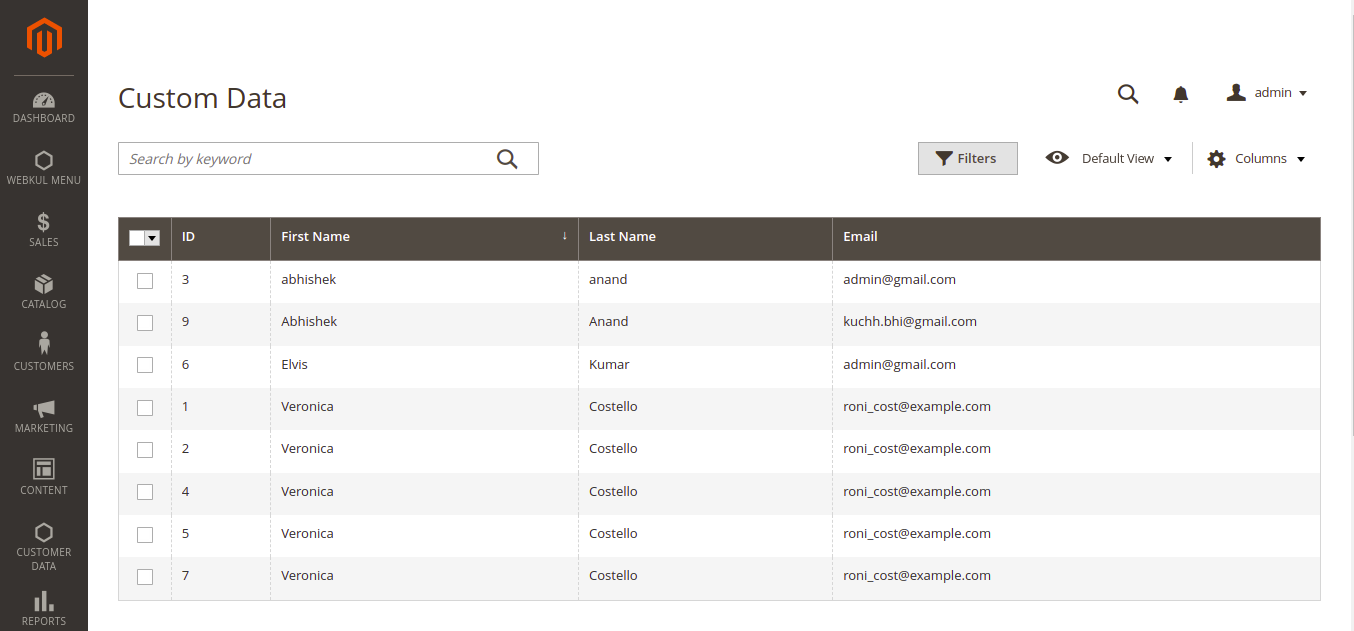
In this blog we will learn how to create custom admin grid. Magento 2 grids are a way to list the items in a database table for better management. Grid allows us to sort, filter, edit and update data.
Before you begin: You should have a custom module, in that you need to create menu and other related files and folders.
If you want to create custom menu click here.
To register a frontend route, we must create a routes.xml file:
Step 1: Create routes.xml
app/code/Bluethink/CustomMenu/etc/adminhtml/routes.xml
|
1 2 3 4 5 6 7 |
<config xmlns:xsi="http://www.w3.org/2001/XMLSchema-instance" xsi:noNamespaceSchemaLocation="urn:magento:framework:App/etc/routes.xsd"> <router id="admin"> <route id="menu" frontName="menu"> <module name="Bluethink_CustomMenu"/> </route> </router> </config> |
The id attribute is a unique string which will identify this route.
The frontName attribute is also a unique string which will be shown on the url request.
Step 2: Create controller
app/code/Bluethink/CustomMenu/Controller/Adminhtml/Post/Index.php
All controllers have to contain a public execute method. It is called when accessing the controller. The storefront controllers are inherited from the \Magento\Framework\App\Action\Action class.
|
1 2 3 4 5 6 7 8 9 10 11 12 13 14 15 16 17 18 19 20 |
<?php namespace Bluethink\CustomMenu\Controller\Adminhtml\Post; class Index extends \Magento\Backend\App\Action { protected $resultPageFactory = false; public function __construct( \Magento\Backend\App\Action\Context $context, \Magento\Framework\View\Result\PageFactory $resultPageFactory ) { parent::__construct($context); $this->resultPageFactory = $resultPageFactory; } public function execute() { $resultPage = $this->resultPageFactory->create(); $resultPage->getConfig()->getTitle()->prepend((__('Custom Data'))); return $resultPage; } } |
After create controller we will create layout file.
Step 3: Create menu_post_index.xml
app/code/Bluethink/CustomMenu/view/adminhtml/layout/menu_post_index.xml
The layout file is an XML file which will define the page structure.
|
1 2 3 4 5 6 7 8 |
<page xmlns:xsi="http://www.w3.org/2001/XMLSchema-instance" xsi:noNamespaceSchemaLocation="../../../../../../../lib/internal/Magento/Framework/View/Layout/etc/page_configuration.xsd"> <update handle="styles"/> <body> <referenceContainer name="content"> <uiComponent name="quote_listing"/> </referenceContainer> </body> </page> |
In this layout file, we declare an uiComponent for the content of this page. Basically with uiComponent, Magento allows us to create nice user interface for lists, forms etc. we need to create ui_component folder inside view/adminhtml folder.
Step 4: Create quote_listing.xml
app/code/Bluethink/CustomMenu/view/adminhtml/ui_component/quote_listing.xml
In the ui_component folder, we will finally create the UI Grid and display customer data.
|
1 2 3 4 5 6 7 8 9 10 11 12 13 14 15 16 17 18 19 20 21 22 23 24 25 26 27 28 29 30 31 32 33 34 35 36 37 38 39 40 41 42 43 44 45 46 47 48 49 50 51 52 53 54 55 56 57 58 59 60 61 62 63 64 65 66 67 68 69 70 71 72 73 74 75 76 77 78 79 80 81 82 83 84 85 86 87 88 89 90 91 92 93 94 95 96 97 98 99 100 |
<?xml version="1.0" encoding="UTF-8"?> <listing xmlns:xsi="http://www.w3.org/2001/XMLSchema-instance" xsi:noNamespaceSchemaLocation="urn:magento:module:Magento_Ui:etc/ui_configuration.xsd"> <argument name="data" xsi:type="array"> <item name="js_config" xsi:type="array"> <item name="provider" xsi:type="string">quote_listing.quote_listing_data_source</item> <item name="deps" xsi:type="string">quote_listing.quote_listing_data_source</item> </item> <item name="spinner" xsi:type="string">spinner_columns</item> </argument> <dataSource name="nameOfDataSource"> <argument name="dataProvider" xsi:type="configurableObject"> <argument name="class" xsi:type="string">Magento\Framework\View\Element\UiComponent\DataProvider\DataProvider</argument> <argument name="name" xsi:type="string">quote_listing_data_source</argument> <argument name="primaryFieldName" xsi:type="string">entity_id</argument> <argument name="requestFieldName" xsi:type="string">id</argument> <argument name="data" xsi:type="array"> <item name="config" xsi:type="array"> <item name="component" xsi:type="string">Magento_Ui/js/grid/provider</item> <item name="update_url" xsi:type="url" path="mui/index/render" /> <item name="storageConfig" xsi:type="array"> <item name="indexField" xsi:type="string">entity_id</item> </item> </item> </argument> </argument> </dataSource> <listingToolbar name="listing_top"> <argument name="data" xsi:type="array"> <item name="config" xsi:type="array"> <item name="sticky" xsi:type="boolean">true</item> </item> </argument> <bookmark name="bookmarks"/> <columnsControls name="columns_controls"/> <filterSearch name="fulltext"/> <filters name="listing_filters" /> </listingToolbar> <columns name="spinner_columns"> <selectionsColumn name="ids"> <argument name="data" xsi:type="array"> <item name="config" xsi:type="array"> <item name="resizeEnabled" xsi:type="boolean">false</item> <item name="resizeDefaultWidth" xsi:type="string">55</item> <item name="indexField" xsi:type="string">entity_id</item> </item> </argument> </selectionsColumn> <column name="entity_id"> <argument name="data" xsi:type="array"> <item name="config" xsi:type="array"> <item name="filter" xsi:type="string">textRange</item> <item name="sorting" xsi:type="string">asc</item> <item name="label" xsi:type="string" translate="true">ID</item> </item> </argument> </column> <column name="customer_firstname"> <argument name="data" xsi:type="array"> <item name="config" xsi:type="array"> <item name="filter" xsi:type="string">text</item> <item name="editor" xsi:type="array"> <item name="editorType" xsi:type="string">text</item> <item name="validation" xsi:type="array"> <item name="required-entry" xsi:type="boolean">true</item> </item> </item> <item name="label" xsi:type="string" translate="true">First Name</item> </item> </argument> </column> <column name="customer_lastname"> <argument name="data" xsi:type="array"> <item name="config" xsi:type="array"> <item name="filter" xsi:type="string">text</item> <item name="editor" xsi:type="array"> <item name="editorType" xsi:type="string">text</item> <item name="validation" xsi:type="array"> <item name="required-entry" xsi:type="boolean">true</item> </item> </item> <item name="label" xsi:type="string" translate="true">Last Name</item> </item> </argument> </column> <column name="customer_email"> <argument name="data" xsi:type="array"> <item name="config" xsi:type="array"> <item name="filter" xsi:type="string">text</item> <item name="editor" xsi:type="array"> <item name="editorType" xsi:type="string">text</item> <item name="validation" xsi:type="array"> <item name="required-entry" xsi:type="boolean">true</item> </item> </item> <item name="label" xsi:type="string" translate="true">Email</item> </item> </argument> </column> </columns> </listing> |
Step 5: Create di.xml
app/code/Bluethink/CustomMenu/etc/di.xml
Declare resource in dependency injection file. Now we will create di.xml file which will connect to the Model to get the data for our grid.
|
1 2 3 4 5 6 7 8 9 10 11 12 13 14 15 |
<config xmlns:xsi="http://www.w3.org/2001/XMLSchema-instance" xsi:noNamespaceSchemaLocation="../../../../../lib/internal/Magento/Framework/ObjectManager/etc/config.xsd"> <type name="Magento\Framework\View\Element\UiComponent\DataProvider\CollectionFactory"> <arguments> <argument name="collections" xsi:type="array"> <item name="quote_listing_data_source" xsi:type="string">Magento\Quote\Model\ResourceModel\Quote\Grid\Collection</item> </argument> </arguments> </type> <virtualType name="Magento\Quote\Model\ResourceModel\Quote\Grid\Collection" type="Magento\Framework\View\Element\UiComponent\DataProvider\SearchResult"> <arguments> <argument name="mainTable" xsi:type="string">quote</argument> <argument name="resourceModel" xsi:type="string">Magento\Quote\Model\ResourceModel\Quote</argument> </arguments> </virtualType> </config> |
The type is used for changing arguments of class or to pass new arguments to that class. Whereas virtualType is used to create a virtual sub-class (means we don’t have to create the .php file).
Step 6: Create UpgradeSchema.php
app/code/Bluethink/CustomMenu/Setup/UpgradeSchema.php
In this blog we use magento quote table, we need to index table for perform full text search in admin grid.
|
1 2 3 4 5 6 7 8 9 10 11 12 13 14 15 16 17 18 19 20 21 22 23 24 25 26 27 28 |
<?php namespace Bluethink\CustomMenu\Setup; use Magento\Framework\Setup\UpgradeSchemaInterface; use Magento\Framework\Setup\ModuleContextInterface; use Magento\Framework\Setup\SchemaSetupInterface; class UpgradeSchema implements UpgradeSchemaInterface { public function upgrade( SchemaSetupInterface $setup, ModuleContextInterface $context ) { $installer = $setup; $installer->startSetup(); if (version_compare($context->getVersion(), '1.0.0', '<')) { $installer->getConnection()->addIndex( $installer->getTable('quote'), $setup->getIdxName( $installer->getTable('quote'), ['customer_firstname', 'customer_lastname', 'customer_email'], \Magento\Framework\DB\Adapter\AdapterInterface::INDEX_TYPE_FULLTEXT ), ['customer_firstname', 'customer_lastname', 'customer_email'], \Magento\Framework\DB\Adapter\AdapterInterface::INDEX_TYPE_FULLTEXT ); } $installer->endSetup(); } } |
Step 7: Run command
php bin/magento setup:upgrade
php bin/magento setup:di:compile
php bin/magento cache:flush
You can download sample module for admin menu here.


bluethinkinc_blog
2022-09-01