

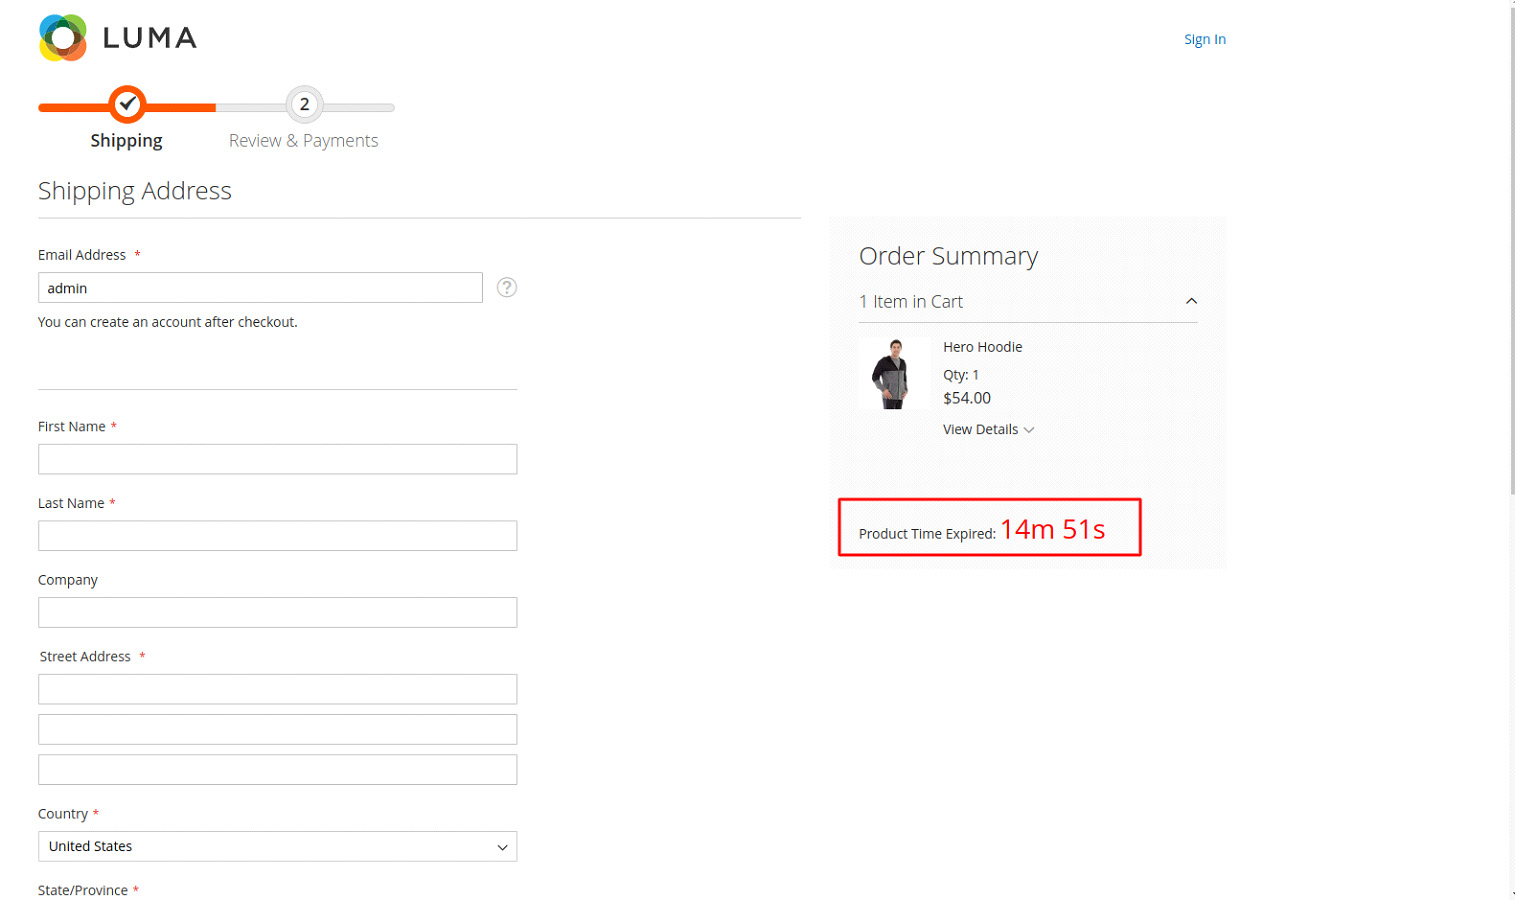
Custom Timer on the checkout page are used to show time about the products that are added to the shopping cart. When time expires then shopping cart clear.
Step 1: Create a “Registration.php” file inside the following path:
app\code\Bluethink\Checkouttimer
Now add the below code:
|
1 2 3 4 5 6 |
<?php \Magento\Framework\Component\ComponentRegistrar::register( \Magento\Framework\Component\ComponentRegistrar::MODULE, 'Bluethink_Checkouttimer', __DIR__ ); |
Step 2: Create a “module.xml” file inside the following path:
app\code\Bluethink\Checkouttimer\etc
Now add the below code:
|
1 2 3 4 5 |
<?xml version="1.0" ?> <config xmlns:xsi="http://www.w3.org/2001/XMLSchema-instance" xsi:noNamespaceSchemaLocation="urn:magento:framework:Module/etc/module.xsd"> <module name="Bluethink_Checkouttimer" setup_version="1.0.1"> </module> </config> |
Step 3: Create a “checkout_index_index.xml” file inside the following path:
app\code\Bluethink\Checkouttimer\view\frontend\layout
Now add the below code:
|
1 2 3 4 5 6 7 8 9 10 11 12 13 14 15 16 17 18 19 20 21 22 23 24 25 26 27 28 29 30 31 32 33 34 35 36 37 38 39 |
<?xml version="1.0"?> <page xmlns:xsi="http://www.w3.org/2001/XMLSchema-instance" layout="1column" xsi:noNamespaceSchemaLocation="urn:magento:framework:View/Layout/etc/page_configuration.xsd"> <head> <css src="Bluethink_Checkouttimer::css/customcheckout.css"/> </head> <body> <referenceBlock name="checkout.root"> <arguments> <argument name="jsLayout" xsi:type="array"> <item name="components" xsi:type="array"> <item name="checkout" xsi:type="array"> <item name="children" xsi:type="array"> <item name="sidebar" xsi:type="array"> <item name="children" xsi:type="array"> <item name="summary" xsi:type="array"> <item name="children" xsi:type="array"> <item name="itemsAfter" xsi:type="array"> <item name="children" xsi:type="array"> <item name="custom_sidebar" xsi:type="array"> <item name="component" xsi:type="string">Bluethink_Checkouttimer/js/view/timer_sidebar</item> <item name="displayArea" xsi:type="string">summary</item> <item name="config" xsi:type="array"> <item name="template" xsi:type="string">Bluethink_Checkouttimer/timer_sidebar</item> </item> </item> </item> </item> </item> </item> </item> </item> </item> </item> </item> </argument> </arguments> </referenceBlock> </body> </page> |
Step 4: Create a “custom_timer_sidebar.js” file inside the following path:
app\code\Bluethink\Checkouttimer\view\frontend\web\js\view
Now add the below code:
|
1 2 3 4 5 6 7 8 9 10 11 12 13 14 15 16 17 18 19 20 21 22 23 24 25 26 27 28 29 30 31 32 33 34 35 36 37 38 39 40 41 42 43 44 45 46 47 48 49 50 51 52 53 54 55 56 57 58 59 60 61 62 63 64 65 66 67 68 69 70 71 72 73 74 75 76 77 78 79 |
define([ 'uiComponent', 'ko', 'jquery', 'mage/url' ], function(Component, ko, $, url) { 'use strict'; return Component.extend({ initialize: function () { this._super(); }, isenable:function() { var isenable1=window.checkoutConfig.payment.custom_config.ischecouttimerenabled; return isenable1; }, checkouttimelabel:function() { var checkouttimelabel=window.checkoutConfig.checkouttimelabel.custom_config.checkouttimelabel; return document.getElementById("countdown1").innerHTML = checkouttimelabel; }, getClock: function () { var siteurl = url.build('checkouttimer/index/index'); $.ajax({ type: 'POST', url: siteurl, showLoader: false, cache: false, success: function (response) { var data = $.parseJSON(response); if (data.message.trim() == 'true') { var date = data.date; var timeZone = data.nowtime; var countDownDate = new Date(date).getTime(); var nowtime=data.nowtime; // Update the count down every 1 second var x = setInterval(function() { // Get today's date and time var newdate=new Date().toLocaleString("en-US", {timeZone: timeZone});; //console.log("current time"+newdate); var now = new Date(newdate).getTime(); // Find the distance between now and the count down date var distance = countDownDate - now; var minutes = Math.floor((distance % (1000 * 60 * 60)) / (1000 * 60)); var seconds = Math.floor((distance % (1000 * 60)) / 1000); // Output the result in an element with id="demo" document.getElementById("countdown").innerHTML = minutes + "m " + seconds + "s "; // If the count down is over, write some text if (distance < 0) { clearInterval(x); document.getElementById("countdown").innerHTML = "Cart expired."; document.getElementById("countdown1").innerHTML = ""; var siteurl = url.build('clearquote/index/quoteclear'); //console.log(siteurl); $.ajax({ type: 'POST', url: siteurl, showLoader: false, cache: false, success: function (response) { console.log(response); var data = $.parseJSON(response); if (data.message.trim() == 'true') { return location.reload(); }else { return location.reload(); } } }); } }, 1000); } } }); } }); }); |
Step 5: Create a “timer_sidebar.html” file inside the following path:
app\code\Bluethink\Checkouttimer\view\frontend\web\template
Now add the below code:
|
1 2 3 4 5 6 |
<!-- ko if: isenable()==='1' --> <div class="timer-box"> <span id="countdown1" data-bind="html: checkouttimelabel()"></span> <span class="countdown" id="countdown" data-bind="html: getClock()"></span> </div> <!-- /ko --> |
Step 6: Create a “Index.php” file inside the following path:
app\code\Bluethink\Checkouttimer\Controller\Index
Now add the below code:
|
1 2 3 4 5 6 7 8 9 10 11 12 13 14 15 16 17 18 19 20 21 22 23 24 25 26 27 28 29 30 31 32 33 34 35 36 37 38 39 40 41 42 43 44 45 46 47 48 49 50 51 52 53 54 |
<?php /** * Copyright © Magento, Inc. All rights reserved. * See COPYING.txt for license details. */ namespace Bluethink\Checkouttimer\Controller\Index; use Magento\Quote\Model\QuoteFactory; use Magento\Checkout\Model\Session as CheckoutSession; class Index extends \Magento\Framework\App\Action\Action { protected $_pageFactory; protected $quoteFactory; protected $_objectManager; protected $_date; protected $quoteRepository; public function __construct( \Magento\Framework\App\Action\Context $context, CheckoutSession $checkoutSession, \Magento\Framework\Stdlib\DateTime\TimezoneInterface $date, \Magento\Quote\Model\QuoteRepository $quoteRepository, \Magento\Framework\ObjectManagerInterface $objectmanager, \Magento\Quote\Api\CartRepositoryInterface $quoteFactory, \Magento\Framework\View\Result\PageFactory $pageFactory) { $this->_pageFactory = $pageFactory; $this->quoteFactory = $quoteFactory; $this->_date = $date; $this->_objectManager = $objectmanager; $this->quoteRepository = $quoteRepository; $this->checkoutSession = $checkoutSession; return parent::__construct($context); } public function execute() { $ConfigTimezone= $this->_date->getConfigTimezone(); $time = $this->_date->date()->format('d M,Y H:i:s'); $customerSession = $this->_objectManager->get('Magento\Customer\Model\Session'); $current_quote = $this->checkoutSession->getQuote(); //$current_quote = $this->quoteFactory->get($current_quote->getId()); if($current_quote->getId()) { $quotedata = $this->quoteRepository->get($current_quote->getId()); $date=$quotedata->getData('reserved_time'); $data = array('message'=>'true','date' =>$date,'nowtime'=>$ConfigTimezone); echo json_encode($data); }else { $data = array('message'=>'false'); echo json_encode($data); } exit(); } } |
Step 7: Create a “QuoteClear.php” file inside the following path:
app\code\Bluethink\Checkouttimer\Controller\Index
Now add the below code:
|
1 2 3 4 5 6 7 8 9 10 11 12 13 14 15 16 17 18 19 20 21 22 23 24 25 26 27 28 29 30 31 32 33 34 |
<?php /** * Copyright © Magento, Inc. All rights reserved. * See COPYING.txt for license details. */ namespace Bluethink\Checkouttimer\Controller\Index; class QuoteClear extends \Magento\Framework\App\Action\Action { protected $_objectManager; protected $_pageFactory; private $helperData; public function __construct( \Magento\Framework\App\Action\Context $context, \Magento\Framework\ObjectManagerInterface $objectmanager, \Magento\Framework\View\Result\PageFactory $pageFactory) { $this->_pageFactory = $pageFactory; $this->_objectManager = $objectmanager; return parent::__construct($context); } public function execute() { $cartObject = $this->_objectManager->create('Magento\Checkout\Model\Cart')->truncate(); if($cartObject->save()) { $data = array('message'=>'true'); echo json_encode($data); }else { $data = array('message'=>'false'); echo json_encode($data); } } } |
Step 8: Create a “Data.php” file inside the following path:
app\code\Bluethink\Checkouttimer\Helper
Now add the below code:
|
1 2 3 4 5 6 7 8 9 10 11 12 13 14 15 16 17 18 19 20 21 22 23 24 25 26 27 28 29 30 31 32 33 34 35 36 37 38 39 40 41 42 43 44 |
<?php namespace Bluethink\Checkouttimer\Helper; use Magento\Store\Model\ScopeInterface; use Magento\Store\Model\StoreManagerInterface; use Magento\Framework\App\Config\ScopeConfigInterface; class Data extends \Magento\Framework\App\Helper\AbstractHelper { const CHECKOUT_TIME = 'bluethink_checkout_time/general/checkout_time'; const CHECKOUT_ENABLE_DISABLE="bluethink_checkout_time/general/enable"; const CHECKOUT_TIME_LABEL = 'bluethink_checkout_time/general/checkout_time_label'; private $storeManager; protected $scopeConfig; public function __construct( StoreManagerInterface $storeManager, ScopeConfigInterface $scopeConfig ) { $this->storeManager = $storeManager; $this->scopeConfig = $scopeConfig; } public function checkouttime() { return $this->scopeConfig->getValue( self::CHECKOUT_TIME, ScopeInterface::SCOPE_STORE, $this->storeManager->getStore()->getId() ); } public function isChecoutTimerEnabled() { return $this->scopeConfig->getValue( self::CHECKOUT_ENABLE_DISABLE, ScopeInterface::SCOPE_STORE, $this->storeManager->getStore()->getId() ); } public function checkouttimelabel() { return $this->scopeConfig->getValue( self::CHECKOUT_TIME_LABEL, ScopeInterface::SCOPE_STORE, $this->storeManager->getStore()->getId() ); } } |
Step 9: Create a “ConfigProvider.php” file inside the following path:
app\code\Bluethink\Checkouttimer\Model
Now add the below code:
|
1 2 3 4 5 6 7 8 9 10 11 12 13 14 15 16 17 18 19 20 21 22 23 24 25 26 27 28 29 30 31 32 33 34 35 36 37 38 39 40 41 42 43 44 45 46 |
<?php namespace Bluethink\Checkouttimer\Model; use Magento\Checkout\Model\ConfigProviderInterface; use Magento\Framework\View\LayoutInterface; use Magento\Framework\Serialize\Serializer\Json; use Bluethink\Checkouttimer\Helper\Data; class ConfigProvider implements ConfigProviderInterface { /** @var LayoutInterface */ protected $_layout; private $_serializer; private $helperData; public function __construct( LayoutInterface $layout, Json $_serializer, Data $helperData ) { $this->_layout = $layout; $this->_serializer = $_serializer; $this->helperData = $helperData; } /** * {@inheritdoc} */ public function getConfig() { $isChecoutTimerEnabled = $this->helperData->isChecoutTimerEnabled(); $checkouttimelabel = $this->helperData->checkouttimelabel(); $config = [ 'payment' => [ 'custom_config' => [/*Add your custom variables here*/ 'ischecouttimerenabled' => $isChecoutTimerEnabled, ] ], 'checkouttimelabel' => [ 'custom_config' => [/*Add your custom variables here*/ 'checkouttimelabel' => $checkouttimelabel, ] ] ]; return $config; } } |
Step 10: Create a “SaveToQuote.php” file inside the following path:
app\code\Bluethink\Checkouttimer\Observer
Now add the below code:
|
1 2 3 4 5 6 7 8 9 10 11 12 13 14 15 16 17 18 19 20 21 22 23 24 25 26 27 28 29 30 31 32 33 34 35 36 37 38 39 40 41 42 43 44 45 46 47 |
<?php namespace Bluethink\Checkouttimer\Observer; use Magento\Framework\Event\ObserverInterface; use Bluethink\Checkouttimer\Helper\Data; class SaveToQuote implements ObserverInterface { /** * @param \Magento\Framework\Event\Observer $observer * saves rental fields to quote items */ protected $_date; protected $_objectManager; private $storeManager; private $helperData; protected $quoteRepository; public function __construct(\Magento\Framework\Stdlib\DateTime\TimezoneInterface $date, \Magento\Store\Model\StoreManagerInterface $storeManager, \Magento\Framework\ObjectManagerInterface $objectmanager, Data $helperData, \Magento\Quote\Model\QuoteRepository $quoteRepository ) { $this->_date = $date; $this->storeManager = $storeManager; $this->_objectManager = $objectmanager; $this->helperData = $helperData; $this->quoteRepository = $quoteRepository; } public function execute(\Magento\Framework\Event\Observer $observer) { $checkouttime = $this->helperData->checkouttime(); $isChecoutTimerEnabled = $this->helperData->isChecoutTimerEnabled(); if($isChecoutTimerEnabled=='1') { $storeId = $this->storeManager->getStore()->getId(); $time = $this->_date->date()->format('d M,Y H:i:s'); $newtime= $this->_date->date(strtotime("+".$checkouttime." minutes"))->format('d M,Y H:i:s') ; $cart = $this->_objectManager->get('\Magento\Checkout\Model\Cart'); $quote = $cart->getQuote(); // This will return the current quote $quoteId = $quote->getId(); $quotedata = $this->quoteRepository->get($quoteId); // Get quote by id $quotedata->setData('reserved_time', $newtime); $this->quoteRepository->save($quotedata); // Save quote } } } |
Step 11: Create a “db_schema.xml” file inside the following path:
app\code\Bluethink\Checkouttimer\etc
Now add the below code:
|
1 2 3 4 5 |
<schema xmlns:xsi="http://www.w3.org/2001/XMLSchema-instance" xsi:noNamespaceSchemaLocation="urn:magento:framework:Setup/Declaration/Schema/etc/schema.xsd"> <table name="quote" resource="default" engine="innodb"> <column xsi:type="varchar" name="reserved_time" nullable="true" comment="Reserved Time"/> </table> </schema> |
Step 12: Create a “events.xml” file inside the following path:
app\code\Bluethink\Checkouttimer\etc
Now add the below code:
|
1 2 3 4 5 6 |
<?xml version="1.0"?> <config xmlns:xsi="http://www.w3.org/2001/XMLSchema-instance" xsi:noNamespaceSchemaLocation="urn:magento:framework:Event/etc/events.xsd"> <event name="checkout_cart_add_product_complete"> <observer name="add_custom_column_to_quote" instance="Bluethink\Checkouttimer\Observer\SaveToQuote" /> </event> </config> |
Step 13: Create a “extension_attributes.xml” file inside the following path:
app\code\Bluethink\Checkouttimer\etc
Now add the below code:
|
1 2 3 4 5 |
<config xmlns:xsi="http://www.w3.org/2001/XMLSchema-instance" xsi:noNamespaceSchemaLocation="Api/etc/extension_attributes.xsd"> <extension_attributes for="Magento\Quote\Api\Data\CartInterface"> <attribute code="reserved_time" type="string" /> </extension_attributes> </config> |
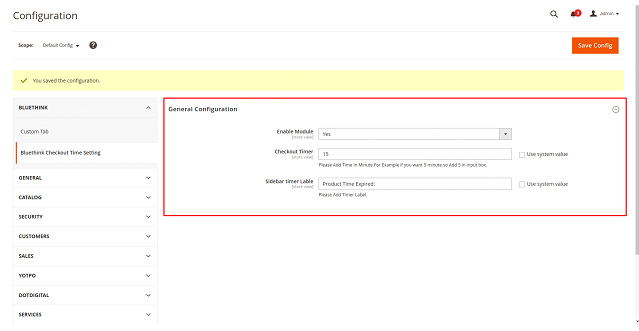
To show configuration in admin
Step 14: Create a “config.xml” file inside the following path:
app\code\Bluethink\Checkouttimer\etc
Now add the below code:
|
1 2 3 4 5 6 7 8 9 10 11 |
<?xml version="1.0"?> <config xmlns:xsi="http://www.w3.org/2001/XMLSchema-instance" xsi:noNamespaceSchemaLocation="urn:magento:module:Magento_Store:etc/config.xsd"> <default> <bluethink_checkout_time> <general> <checkout_time>15</checkout_time> <checkout_time_label>Product Time Expired:</checkout_time_label> </general> </bluethink_checkout_time> </default> </config> |
Step 15: Create a “system.xml” file inside the following path:
app\code\Bluethink\Checkouttimer\etc\adminhtml
Now add the below code:
|
1 2 3 4 5 6 7 8 9 10 11 12 13 14 15 16 17 18 19 20 21 22 23 24 25 26 27 28 |
<?xml version="1.0"?> <config xmlns:xsi="http://www.w3.org/2001/XMLSchema-instance" xsi:noNamespaceSchemaLocation="urn:magento:module:Magento_Config:etc/system_file.xsd"> <system> <tab id="bluethink" translate="label" sortOrder="10"> <label>BlueThink</label> </tab> <section id="bluethink_checkout_time" translate="label" sortOrder="600" showInDefault="1" showInWebsite="1" showInStore="1"> <label>Bluethink Checkout Time Setting</label> <tab>bluethink</tab> <resource>Bluethink_Checkouttimer::bluethink_checkout_time</resource> <group id="general" translate="label" type="text" sortOrder="1" showInDefault="1" showInWebsite="1" showInStore="1" canRestore="1"> <label>General Configuration</label> <field id="enable" translate="label" type="select" sortOrder="1" showInDefault="1" showInWebsite="1" showInStore="1"> <label>Enable Module</label> <source_model>Magento\Config\Model\Config\Source\Yesno</source_model> </field> <field id="checkout_time" translate="label" type="text" sortOrder="1" showInDefault="1" showInWebsite="1" showInStore="1" canRestore="1"> <label>Checkout Timer</label> <comment>Please Add Time In Minute.For Example if you want 5 minute.so Add 5 in input box.</comment> </field> <field id="checkout_time_label" translate="label" type="text" sortOrder="1" showInDefault="1" showInWebsite="1" showInStore="1" canRestore="1"> <label>Sidebar timer Lable</label> <comment>Please Add Timer Label.</comment> </field> </group> </section> </system> </config> |
Step 16: Create a “di.xml” file inside the following path:
app\code\Bluethink\Checkouttimer\etc\frontend
Now add the below code:
|
1 2 3 4 5 6 7 8 9 10 11 |
<?xml version="1.0"?> <config xmlns:xsi="http://www.w3.org/2001/XMLSchema-instance" xsi:noNamespaceSchemaLocation="urn:magento:framework:ObjectManager/etc/config.xsd"> <type name="Magento\Checkout\Model\CompositeConfigProvider"> <arguments> <argument name="configProviders" xsi:type="array"> <item name="custom_config_provider" xsi:type="object">Bluethink\Checkouttimer\Model\ConfigProvider</item> </argument> </arguments> </type> </config> |
Step 17: Create a “routes.xml” file inside the following path:
app\code\Bluethink\Checkouttimer\etc\frontend
Now add the below code:
|
1 2 3 4 5 6 7 8 9 10 11 |
<?xml version="1.0" ?> <config xmlns:xsi="http://www.w3.org/2001/XMLSchema-instance" xsi:noNamespaceSchemaLocation="urn:magento:framework:App/etc/routes.xsd"> <router id="standard"> <route frontName="checkouttimer" id="checkouttimer"> <module name="Bluethink_Checkouttimer"/> </route> <route frontName="clearquote" id="clearquote"> <module name="Bluethink_Checkouttimer"/> </route> </router> </config> |
Step 18:
Now run below Command:
sudo php bin/magento setup:upgrade
sudo php bin/magento setup:di:compile
sudo php bin/magento setup:static-content:deploy -f
sudo php bin/magento c:f


bluethinkinc_blog
2022-11-30