

Step 1:- Install Django: If you haven’t already done so, you will need to install Django. You can do this by running the following command in your terminal or command prompt:
Command : – pip install django
Step2:- Create a new Django project: Once you have installed Django, you can create a new project by running the following command in your terminal or command prompt:
Command:- django-admin startproject projectname
Replace “projectname” with the name you want to give your project.
Step3:- Create a new app: Once you are in the project directory, run the following command to create a new app:
Command:- python manage.py startapp
Replace “appname” with the name you want to give your app.
Step4:- Register the app: Open the settings.py file in your project directory, and find the INSTALLED_APPS list. Add the name of your app to this list, like so:
|
1 2 3 4 5 6 7 8 9 |
INSTALLED_APPS = [ 'django.contrib.admin', 'django.contrib.auth', 'django.contrib.contenttypes', 'django.contrib.sessions', 'django.contrib.messages', 'django.contrib.staticfiles', 'accounts', ] |
Step5:- After that we will create a template folder inside the root directory of django project and inside this template folder we will create admin folder after that inside admin folder we will create login.html file, here copy the code of django admin login.html file and edit as per your requirements.
Follow the below line for django admin login.html file code:
|
1 |
<path_to_your_virtual_env>/lib/python3.x/sitepackages/django/contrib/admin/templates/admin/login.html |
Step6:- We will go to settings.py file for installation of your template files in your project directory and add following lines:
|
1 2 3 4 5 6 7 8 9 10 11 12 13 14 15 16 17 18 |
import os TEMPLATE_DIR=os.path.join(BASE_DIR,'templates') AUTH_USER_MODEL='accounts.CustomUser' TEMPLATES = [ { 'BACKEND': 'django.template.backends.django.DjangoTemplates', 'DIRS': [TEMPLATE_DIR], 'APP_DIRS': True, 'OPTIONS': { 'context_processors': [ 'django.template.context_processors.debug', 'django.template.context_processors.request', 'django.contrib.auth.context_processors.auth', 'django.contrib.messages.context_processors.messages', ], }, }, ] |
Step7:- After that we will create model class for customuser in models.py file:
|
1 2 3 4 5 6 7 8 9 10 11 12 13 14 15 16 17 18 19 20 |
from django.db import models from django.contrib.auth.models import AbstractBaseUser,AbstractUser from django.utils.translation import gettext_lazy as _ from .managers import CustomUserManager class CustomUser(AbstractUser): username=None email=models.EmailField(max_length=254,unique=True) mobile=models.CharField(max_length=50,unique=True) is_verified=models.BooleanField(default=False) email_token=models.CharField(max_length=100,null=True,blank=True) forget_password=models.CharField(max_length=100,null=True,blank=True) last_login_time=models.DateTimeField(null=True,blank=True) last_logout_time=models.DateTimeField(null=True,blank=True) objects = CustomUserManager() USERNAME_FIELD='email' REQUIRED_FIELDS=['mobile'] |
Step8:- We will register model class in admin.py file:
|
1 2 3 4 5 6 7 8 9 10 11 12 13 14 15 16 17 18 19 20 21 |
from .forms import CustomAuthenticationForm from django.contrib import admin from django.contrib.auth.forms import AuthenticationForm from django.contrib.auth.views import LoginView from django.urls import reverse_lazy from .models import * @admin.register(CustomUser) class CustomuserAdmin(admin.ModelAdmin): list_display=('id','mobile','email','forget_password','password') class CustomLoginView(LoginView): authentication_form = CustomAuthenticationForm template_name = 'admin/login.html' redirect_authenticated_user = True def get_success_url(self): return reverse_lazy('admin:index') class CustomAdminSite(admin.AdminSite): login_form = CustomLoginView admin_site = CustomAdminSite() |
Step9:- Now create a new file managers.py file inside your django app:
|
1 2 3 4 5 6 7 8 9 10 11 12 13 14 15 16 17 18 19 20 21 22 23 24 25 26 27 28 29 30 |
from django.contrib.auth.base_user import BaseUserManager class CustomUserManager(BaseUserManager): # A custom user manager to use email and mobile as the authentication fields. def authenticate(self, request, email=None, mobile=None, password=None, **kwargs): # Authenticate a user based on email and mobile. try: user = self.get(email=email) except self.model.DoesNotExist: try: user = self.get(mobile=mobile) except self.model.DoesNotExist: return None if user.check_password(password): return user return None def create_user(self, email=None, mobile=None, password=None, **kwargs): # Create and save a User with the given email and password. if not email and not mobile: raise ValueError('Users must have an email address or mobile number') user = self.model(email=self.normalize_email(email), mobile=mobile, **kwargs) user.set_password(password) user.save(using=self._db) return user def create_superuser(self, email=None, mobile=None, password=None, **kwargs): # Create and save a SuperUser with the given email and password. kwargs.setdefault('is_staff', True) kwargs.setdefault('is_superuser', True) return self.create_user(email=email, mobile=mobile, password=password, **kwargs) |
Step10:- We will create forms.py file inside app for creation of custom authentication form:
|
1 2 3 4 5 6 7 8 9 10 11 12 13 14 15 16 17 18 19 20 |
from django.forms import BaseModelForm from django.contrib.auth.forms import AuthenticationForm from django import forms class CustomAuthenticationForm(AuthenticationForm): """ A custom authentication form to use email and mobile fields. """ email = forms.EmailField(widget=forms.TextInput(attrs={'autofocus': True})) mobile = forms.CharField() def __init__(self, *args, **kwargs): super().__init__(*args, **kwargs) self.fields['username'].widget = forms.HiddenInput() def clean(self): email = self.cleaned_data.get('email') mobile = self.cleaned_data.get('mobile') self.cleaned_data['username'] = email or mobile return super().clean() |
Step11: We will create a new file urls.py inside the app directory:
|
1 2 3 4 5 6 |
from django.urls import path from .views import CustomLoginView urlpatterns = [ path('login/', CustomLoginView.as_view(), name='custom_admin_login'), ] |
Step12:- Now run the project server using below command in your terminal:
Command: python manage.py runserver
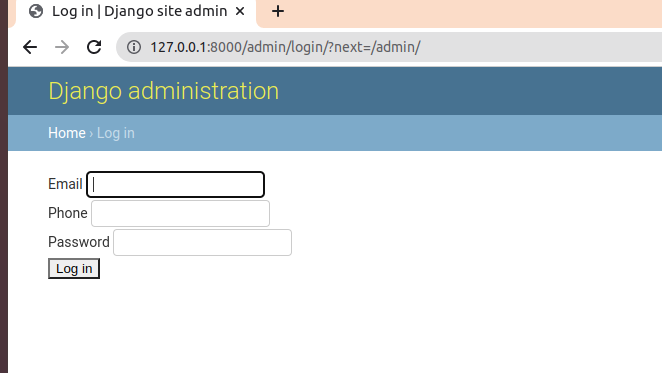
Output:-


bluethinkinc_blog
2023-05-26