We’ll learn how to use simple JWT authentication with the Django Rest Framework. Before we understand JWT Authentication, lets understand –
What is JWT ?
JWT (JSON Web-Token) is a fairly new standard which can be used for token-based authentication. Unlike the built-in Token Authentication Scheme, JWT Authentication does not need to use a database to validate a token. Instead, it relies on cryptographic algorithms and data encoding to ensure the security and integrity of the tokens.
JWT is a single line and encoded String which have three parts: –
Let’s break down the different parts.
1.Header: It defines type and used algorithm, It contains two keys, a token type value and algorithm value used in encoding.
For Example: –
|
1 2 3 4 |
{ "alg": "HS256", "typ": "JWT", } |
2. Payload: The Payload of a JSON Web Token (JWT) contains claims, which are statements about the user, the token itself, or any other relevant information.
For Example: –
|
1 2 3 4 5 |
{ "exp" : "1603641403", "jti" : "7a1c0b5bf14844e0890ab03dd17ecbb", "user_id": 2, } |
Signature: – The signature of a JSON Web Token (JWT) is a crucial component that ensures the token’s integrity and authenticity.
For Example: –
|
1 2 3 4 |
HMACSHA256( base64UrlEncode(header) + "." + base64UrlEncode(payload), secret) |
How Does JWT Works?

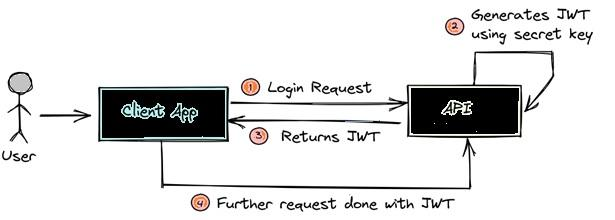
- User Authentication: Client sends a post request i.e the login request with the username and password.
- Token Generation: Once it is successfully authenticated the server/API will create a JWT token which will be signed with a secret key.
- Token Issuance: After creating the JSON Web Token, the API will return it back to the Client Application. The client receives and stores the JWT securely. It can be stored in a cookie, local storage, or a secure token storage mechanism depending on the application type (web, mobile, etc.)
- Token Transmission: When the client wants to access a protected resource (e.g., an API endpoint), it includes the JWT in the request headers.The token is usually included in the “Authorization” header with the “Bearer” prefix (e.g., “Bearer eyJhbGciOi…”).
- Token Verification: After receiving the token by the client app, it is verified to ensure it is authentic and then only it will be used on every subsequent request to authenticate the user so that users do not have to send the credentials anymore.
- Token Verification: The server receives the incoming request and extracts the JWT from the request headers. It verifies the token’s integrity and authenticity by checking the signature using the same secret key that was used to sign the token during generation. If the signature is valid, the token has not been tampered with.
- Claims Validation: The server examines the claims in the payload, including the expiration time (exp) and any custom claims. If the token is not expired and the claims are valid, the server proceeds with the request.
- Access Control: Once the server has successfully verified and validated the JWT, it uses the information in the payload to determine the user’s identity and make access control decisions. It can identify the user, check their permissions, and grant or deny access to the requested resource accordingly.
What is Simple JWT?
Simple JWT is used for authentication in DRF, Simple JWT provides a JSON Web Token Authentication backend for the Django REST Framework. Simple JWT is a tool used with Django REST Framework to handle user authentication using JSON Web Tokens. It comes with a basic set of features that cover common authentication needs and can be easily customized if you require additional functionality.
Before you dive into using Simple JWT, it’s essential to establish the data models that represent user information for your authentication system.
Step 1: Create Project
The very first step is creating a Django project.
We’ll use a Django’s default authentication system (User model) that is based on usernames and passwords,
Step 2 : Create API’s for the User
The next step is to add Django Rest Framework (DRF) to your project
To install DRF, use the following command:
pip install djangorestframework
then add ‘rest_framework’ in project settings.py file.
|
1 2 3 4 5 6 7 8 9 10 |
INSTALLED_APPS = [ 'django.contrib.admin', 'django.contrib.auth', 'django.contrib.contenttypes', 'django.contrib.sessions', 'django.contrib.messages', 'django.contrib.staticfiles', 'rest_framework', #add this 'simplejwtapp', ] |
Next, we create serializers for the User model.
|
1 2 3 4 5 6 7 8 9 10 11 12 13 |
from rest_framework import serializers from django.contrib.auth.models import User class user_registration_serializer(serializers.ModelSerializer): class Meta: model = User fields = ['username','password'] extra_kwargs={ 'password':{'write_only':True} } def create(self, validated_data): data = User.objects.create_user(**validated_data) return data |
Now we’ll create our views for registering the user. Open views.py of app and copy the below code.
|
1 2 3 4 5 6 7 8 9 10 11 12 13 14 15 16 |
from django.shortcuts import render from rest_framework.response import Response from rest_framework.views import APIView from .serializers import user_registration_serializer from django.contrib.auth import authenticate from rest_framework.permissions import IsAuthenticated # Create your views here. class user_registration(APIView): def post(self, request): serializer = user_registration_serializer(data=request.data) if serializer.is_valid(raise_exception=True): user = serializer.save() return Response({'user':user.username,'data':'Registration successful'}) return Response(serializer.errors) |
Step 3: Define URL for Views
Create a new file name urls.py in your app. And copy the below code:
|
1 2 3 4 5 6 7 8 |
from django.contrib import admin from django.urls import path from .views import user_registration, user_login,HelloView urlpatterns = [ path('admin/', admin.site.urls), path('register/',user_registration.as_view(), name='register'), ] |
Now, we have to link the urls.py file of the “app” app to the main project, To do this, modify the “urls.py” file in the project as follows:
from django.contrib import admin
from django.urls import path, include
urlpatterns = [
path(‘admin/’, admin.site.urls),
path(‘api/’,include(‘simplejwtapp.urls’)),
]
Step 4: Using Simple JWT to Login User: –
Now we’ll use Simple JWT to log in users and generate access and refresh tokens for user authentication. To get Simple JWT, install it in your project directory using the command.
pip install djangorestframework-simplejwt
After installing add ‘rest_framework_simplejwt’ in project settings.py file
|
1 2 3 4 5 |
INSTALLED_APPS = [ 'rest_framework', 'rest_framework_simplejwt', #add this 'simplejwtapp', ] |
Next, you need to set up your Django project to use the Simple JWT library. In the settings.py file, add rest_framework_simplejwt.authentication.JWTAuthentication to the list of authentication classes.
|
1 2 3 4 5 6 |
# JWT authentication REST_FRAMEWORK = { 'DEFAULT_AUTHENTICATION_CLASSES': ( 'rest_framework_simplejwt.authentication.JWTAuthentication', ), } |
In the urls.py file within our app, we’ll define routes for Simple JWT, including views like TokenObtainPairView and TokenRefreshView.
|
1 2 3 4 5 6 7 8 9 10 11 12 13 14 |
from django.contrib import admin from django.urls import path from .views import user_registration, user_login,HelloView from rest_framework_simplejwt.views import ( TokenObtainPairView, TokenRefreshView, ) urlpatterns = [ path('admin/', admin.site.urls), path('register/',user_registration.as_view(), name='register'), path('token/', TokenObtainPairView.as_view(), name='token_obtain_pair'), path('token/refresh/', TokenRefreshView.as_view(), name='token_refresh'), ] |
We’ve completed the authentication setup for our project.
we’re ready to check if our project works correctly, and we’ll use an app called Postman for this purpose. You can begin by visiting the Postman website and setting up a new workspace.
Now, in the URL field, type http://127.0.0.1:8000/api/register.
Choose the “Body” option. Then, select the “form-data” radio button, and create a new user by entering their username and password.
And, click the “Send” button, and you’ll receive JSON data below that displays the information of the new user we just added.

Next, let’s log in the user we registered earlier by changing the URL to “http://127.0.0.1:8000/api/token/.”
In the “Body” section, provide the correct login credentials. After clicking the “Send” button, you’ll receive two types of tokens: an Access Token and a Refresh Token.

You can also adjust how Simple JWT behaves by changing settings in the settings.py file.
|
1 2 3 4 5 6 |
from datetime import timedelta SIMPLE_JWT = { 'ACCESS_TOKEN_LIFETIME': timedelta(minutes=60), 'REFRESH_TOKEN_LIFETIME': timedelta(days=10), } |
Now we’ll check Token authenticity:
Create a protected View in views.py
|
1 2 3 4 5 6 |
class HelloView(APIView): permission_classes = (IsAuthenticated, ) def get(self, request): content = {'message': 'Successful'} return Response(content) |
Define url for this view in app ulrs.py file: –
|
1 |
path('hello/', HelloView.as_view(), name ='hello'), |
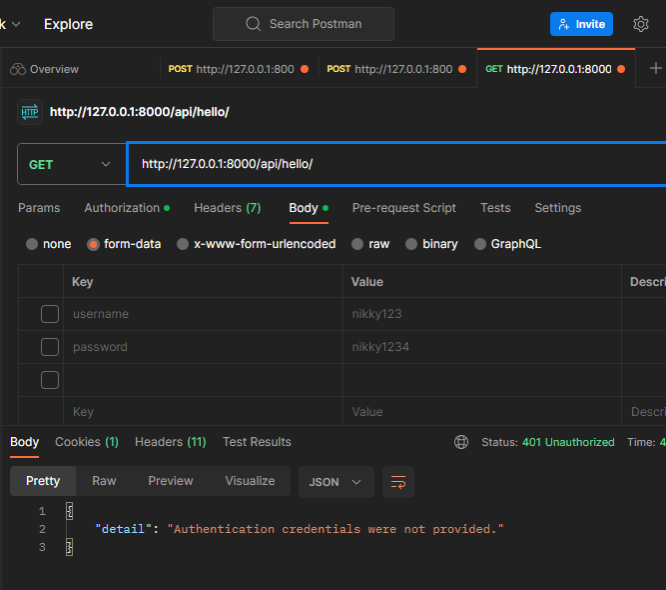
Now try to access this view without Access Token
You will get error message of Authentication credentials were not provided.

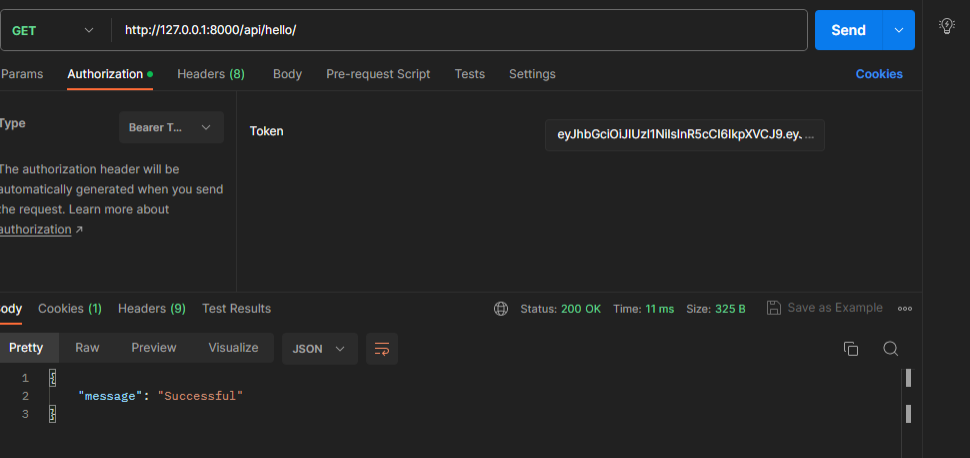
To access this view we need to provide access token for this go to the authorization section select Bearer Token and then in the Token field provide access token that you get during user login.
Then we will see the message of success that we provided in hello view


Nikky Kumari
2024-05-20