In this blog we learn about How to Create Custom Rest API in Magento2. Using API you can speed up getting, sending and processing data of any e commerce store. Magento API is a framework that provides developers with web services which communicate well with the Magento system and it also provides the ability to manage ecommerce stores effectively.
Before you begin: You should have a custom module, in that you need to create webapi and other related files and folders
Create webapi.xml at app/code/VenderName/ModuleName/etc/webapi.xml with the below code:
|
1 2 3 4 5 6 7 8 9 10 |
<?xml version="1.0" ?> <routes xmlns:xsi="http://www.w3.org/2001/XMLSchema-instance" xsi:noNamespaceSchemaLocation="urn:magento:module:Magento_Webapi:etc/webapi.xsd"> <route method="{{request-type}}" url="/V1/{{endpoint}}"> <service class="VenderName\ModuleName\Api\customInterface" method="{{request-method-name}}"/> <resources> <resource ref="{{resource-id}}"/> </resources> </route> </routes> |
request-type: HTTP – defines several methods that indicates the desired action to be performed on a resource. Most commonly are: GET, POST, PUT, and DELETE, but there are several others.
So {{request-type}} can be replace with GET/POST/PUT/DELETE.
{{endpoint}}: This is the endpoint that will be use in URI
Service Class: This class should be interface. In this specify what methods a class should implement. You need to define all the API methods that you want to expose to the web in the interface. All the methods should have a doc-block. If your method expects parameters than all the parameters must be defined in the doc-block as @params {{type}} {{param}} {{description}}. Return type of the method must be defined as @return {{type}} {{description}}
request-method-name: this is the specific method which will be called by the endpoint.
Resource-id: the resource tag defines the access control these can be several level of access:
- Admin: for admin level access you need to define admin resource in the resource tag.
- Customer: for customer level access you need to set self in the resource.
- Guest: for guest level resources you need to define anonymous in the resource tag.
- In the case if you have any resource id for specific access control, you have to simply put that resource id like as Magento_Catalog::catalog
Create di.xml at app/code/VenderName/ModuleName/etc/di.xml with the below code:
|
1 2 3 4 5 6 |
<?xml version="1.0"?> <config xmlns:xsi="http://www.w3.org/2001/XMLSchema-instance" xsi:noNamespaceSchemaLocation="urn:magento:framework:ObjectManager/etc/config.xsd"> <preference for="VendorName\ModuleName\Api\CustomInterface" type="VendorName\ModuleName\Model\Api\Custom"/> </config> |
Here VenderName/ModuleName\Model\Api\Custom.php is implements customInterface class by using Magento 2 prefrence node.
Create CustomInterface.php in path VenderName/ModuleName/CustomApi/Api/CustomInterface.php
|
1 2 3 4 5 6 7 8 9 10 11 12 13 14 15 |
<?php namespace Vender\ModuleName\Api; interface CustomInterface { /** * Short description * * @param type $items * @return void */ public function {{request-method-name}}($items); } ?> |
Create Custom.php in path app/code/VendorName/ModuleName/Model/Api/Custom.php
|
1 2 3 4 5 6 7 8 9 10 11 12 13 14 15 16 17 18 19 20 |
<?php namespace Vender\ModuleName\Model\Api; use Psr\Log\LoggerInterface; class Custom { protected $logger; public function __construct( LoggerInterface $logger ) { $this->logger = $logger; } /** * @inheritdoc */ public function {{request-method-name}}($items) |
For the demonstration here we’ll going to create a custom RestAPI to add product in Magento2
Before you begin create a module Bluethink_CustomApi in app/code/
Let’s start: Please follow the below steps:
Step1: Create webapi.xml at app/code/Bluethink/CustomApi/etc/webapi.xml with the below code:
|
1 2 3 4 5 6 7 8 9 10 |
<?xml version="1.0" ?> <routes xmlns:xsi="http://www.w3.org/2001/XMLSchema-instance" xsi:noNamespaceSchemaLocation="urn:magento:module:Magento_Webapi:etc/webapi.xsd"> <route method="POST" url="/V1/addproduct"> <service class="Bluethink\CustomApi\Api\ProductManagementInterface" method="setProduct"/> <resources> <resource ref="admin"/> </resources> </route> </routes> |
Step2: Create di.xml at app/code/Bluethink/CustomApi/etc/di.xml with the below code:
|
1 2 3 4 5 6 7 8 9 |
<?xml version="1.0"?> <config xmlns:xsi="http://www.w3.org/2001/XMLSchema-instance" xsi:noNamespaceSchemaLocation="urn:magento:framework:ObjectManager/etc/config.xsd"> <preference for="Bluethink\CustomApi\Api\ProductManagementInterface" type="Bluethink\CustomApi\Model\Api\ProductManagement"/> </config> |
Step3: Create ProductManagementInterface.php in path app/code/Bluethink/CustomApi/Api/ProductManagementInterface.php
|
1 2 3 4 5 6 7 8 9 10 11 12 13 14 15 |
<?php namespace Bluethink\CustomApi\Api; interface ProductManagentInterface { /** * POST for Post api * * @param mixed $product * @return void */ public function setProduct($product); } ?> |
Step4: Create ProductManagement.php in path app/code/Bluethink/CustomApi/Model/Api/ProductManagement .php
|
1 2 3 4 5 6 7 8 9 10 11 12 13 14 15 16 17 18 19 20 21 22 23 24 25 26 27 28 29 30 31 32 33 34 35 36 37 38 39 40 41 42 43 44 45 46 47 48 49 50 51 52 53 54 55 56 57 58 59 60 61 62 63 64 65 66 67 68 69 70 71 72 73 74 75 76 77 78 79 80 |
<?php namespace Bluethink\CustomApi\Model\Api; use Exception; use Psr\Log\LoggerInterface; use Magento\Framework\Data\Form\FormKey; use Magento\Catalog\Model\ProductFactory; class ProductManagement { protected $productFactory; protected $logger; public function __construct( FormKey $formkey, LoggerInterface $logger, ProductFactory $productFactory ) { $this->formkey = $formkey; $this->logger = $logger; $this->productFactory = $productFactory; } /** * @inheritdoc */ public function setProduct($product) { try { $result = $this->saveProduct($product); $response = ['success' => true, 'message' => $result]; } catch (Exception $e) { $response = ['success' => false, 'message' => $e->getMessage()]; $this->logger->info($e->getMessage()); } $returnArray = json_encode($response); return $returnArray; } /** * Generate product unique Sku. * * @return string */ public function getSku($productName) { $productName = strtolower($productName); $sku = trim(preg_replace('/[\W_]+/u', '-', $productName)); return $sku; } /** * save product * * @param [Array] $product * @return int */ public function saveProduct($product) { $sku = $this->getSku($product['name']); $product = $this->productFactory->create(); $id = $product->getIdBySku($sku); if ($id != 0) { $product->setId($id); } $product->setSku($sku); // Set your sku here $product->setName($product['name']); // Name of Product $product->setAttributeSetId(4); // Attribute set id $product->setStatus(1); // Status on product enabled/ disabled 1/0 $product->setWeight(10); // weight of product $product->setVisibility(4); // visibilty of product (catalog / search / catalog, search / Not visible individually) $product->setTaxClassId(0); // Tax class id $product->setTypeId('simple'); // type of product (simple/virtual/downloadable/configurable) $product->setPrice($product['price']); // price of product $product->setStockData( array( 'use_config_manage_stock' => 0, 'manage_stock' => 1, 'is_in_stock' => 1, 'qty' => 10000 ) ); $product->save(); return $product->getId(); } } |
Now test api in postman
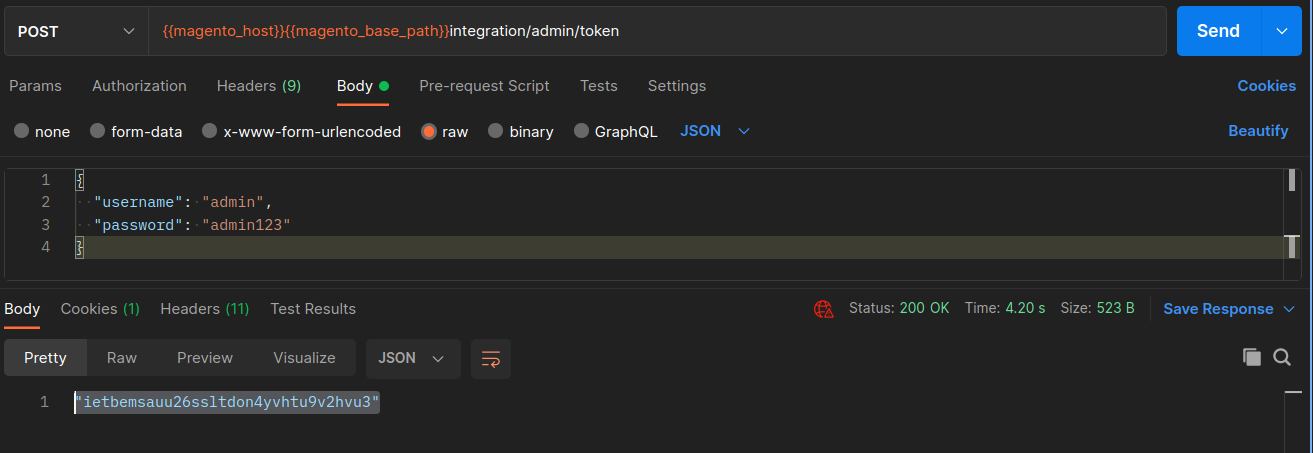
In the resource node we are giving ‘admin’ so we need a admin authorization token to access the API To get the admin token in Magneto select POST http request and write {{base-url}}/rest/all/V1/integration/admin/token in the url In body param send username and password, finally you will get a bearer token something like below:
“ietbemsauu26ssltdon4yvhtu9v2hvu3

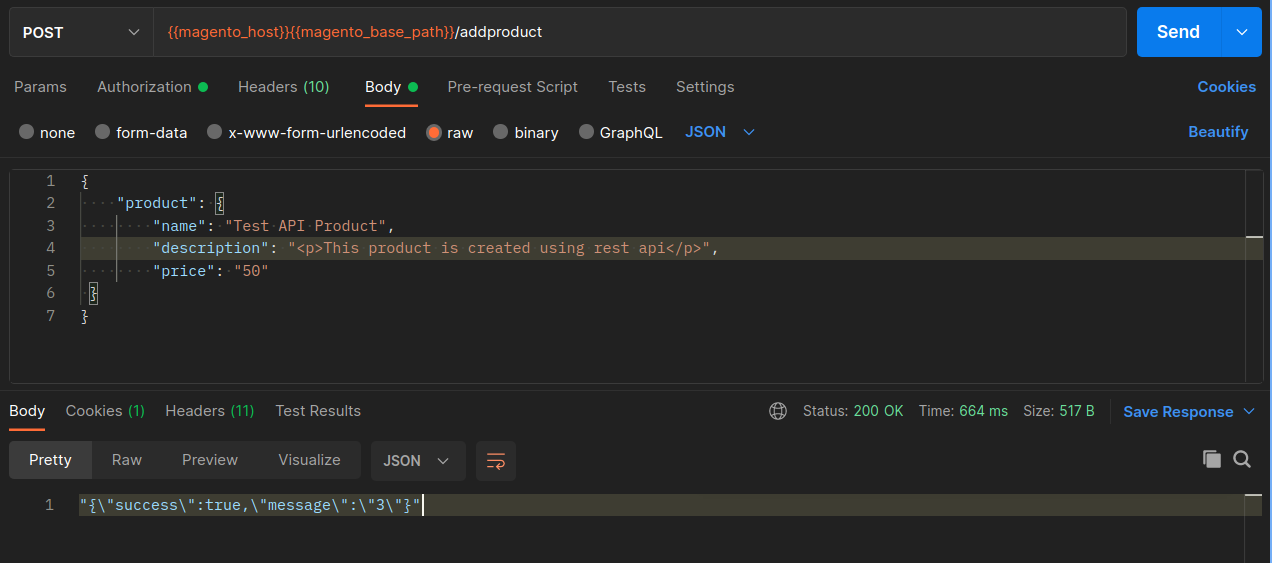
Now again select POST http request and write {{base-url}}/rest/V1/addproduct
In Authorization section select Bearer Token and paste here bearer token.

Send payload
|
1 2 3 4 5 6 7 8 |
{ "product": { "name": "Test API Product", "description": "<p>This product is created using rest api</p>", "price": "50", } } |
You will get Response like below:
“{\”success\”:true,\”message\”:\”3\”}”</>


It was helpful for me.
2022-07-12 at 10:09 pm