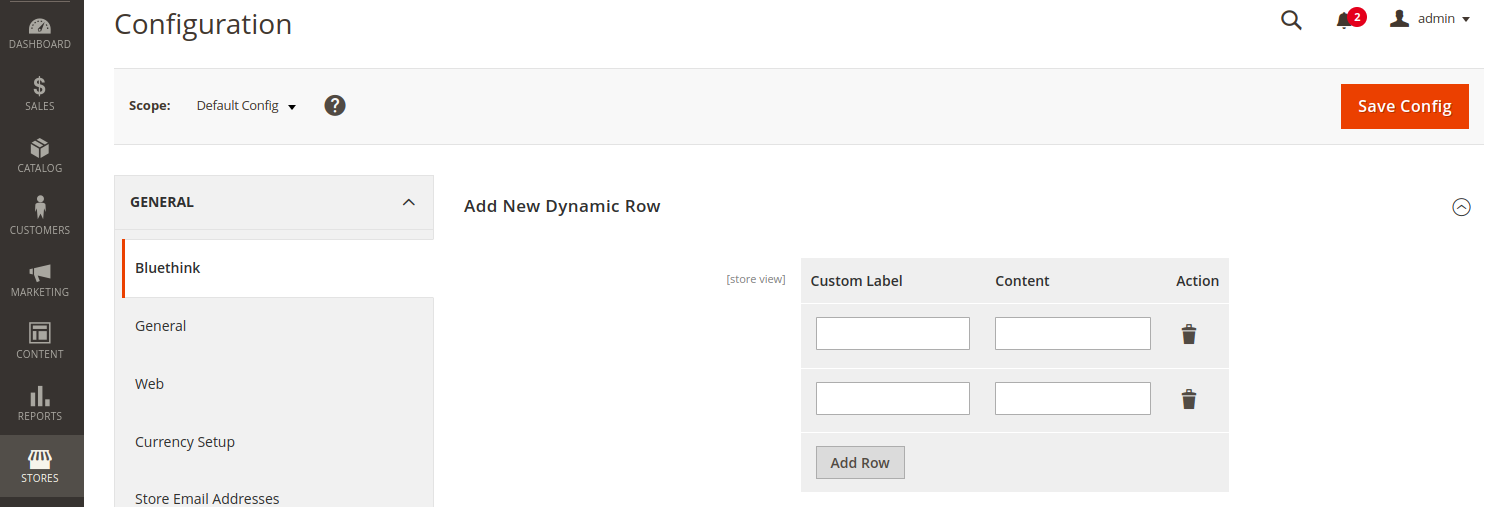
In this article, we will learn how to add a dynamic row in magento store configuration. Sometimes in Modules, there are some situations where we need to get the dynamic data into system configuration.
To solve this problem, Magento provides a special functionality to add, delete and many more operations on different types of UI Components. Here in detail how we can do this step by step.
Step 1: Create file registration.php at app/code/Vendor/Module/ folder.
(In my case vendor is Bluethink, Module is DynamicRow and my file path is:
app/code/Bluethink/DynamicRow/registration.php)
|
1 2 3 4 5 6 7 8 9 10 |
<?php /** * Copyright © Magento, Inc. All rights reserved. * See COPYING.txt for license details. */ \Magento\Framework\Component\ComponentRegistrar::register( \Magento\Framework\Component\ComponentRegistrar::MODULE, 'Bluethink_DynamicRow', __DIR__ ); |
Step 2: Create module.xml file at app/code/Vendor/Module/etc/ folder.
(In my case vendor is Bluethink, Module is DynamicRow and my file path is:
app/code/Bluethink/DynamicRow/etc/module.xml)
|
1 2 3 4 5 6 7 8 9 10 11 12 |
<?xml version="1.0"?> <!-- /** * Copyright © Magento, Inc. All rights reserved. * See COPYING.txt for license details. */ --> <config xmlns:xsi="http://www.w3.org/2001/XMLSchema-instance" xsi:noNamespaceSchemaLocation="urn:magento:framework:Module/etc/module.xsd"> <module name="Bluethink_DynamicRow" > </module> </config> |
Step 3: Create system.xml file at app/code/Vendor/Module/etc/adminhtml folder.
(In my case vendor is Bluethink, Module is DynamicRow and my file path is:
app/code/Bluethink/DynamicRow/etc/adminhtml/system.xml)
|
1 2 3 4 5 6 7 8 9 10 11 12 13 14 15 16 17 18 19 20 21 22 23 24 |
<?xml version="1.0" encoding="UTF-8"?> <!-- /** * Copyright © Magento, Inc. All rights reserved. * See COPYING.txt for license details. */ --> <config xmlns:xsi="http://www.w3.org/2001/XMLSchema-instance" xsi:noNamespaceSchemaLocation="urn:magento:module:Magento_Config:etc/system_file.xsd"> <system> <section id="bluethink_dynamicrow" showInDefault="1"> <label>Bluethink</label> <tab>general</tab> <resource>Bluethink_DynamicRow::config</resource> <group id="add_dynamic_row" translate="label" type="text" sortOrder="10" showInDefault="1" showInWebsite="1" showInStore="1"> <label>Add New Dynamic Row</label> <field id="dynamic_field" translate="label comment" sortOrder="30" showInDefault="1" showInWebsite="1" showInStore="1"> <frontend_model>Bluethink\DynamicRow\Block\Adminhtml\AddRow</frontend_model> <backend_model>Magento\Config\Model\Config\Backend\Serialized\ArraySerialized</backend_model> </field> </group> </section> </system> </config> |
Step 4: Create AddRow.php file at app/code/Vendor/Module/Block/Adminhtml folder.
(In my case vendor is Bluethink, Module is DynamicRow and my file path is:
app/code/Bluethink/DynamicRow/Block/Adminhtml/AddRow.php)
|
1 2 3 4 5 6 7 8 9 10 11 12 13 14 15 16 17 18 19 20 21 22 23 |
<?php namespace Bluethink\DynamicRow\Block\Adminhtml; use Magento\Config\Block\System\Config\Form\Field\FieldArray\AbstractFieldArray; use Magento\Framework\DataObject; use Magento\Framework\Exception\LocalizedException; class AddRow extends AbstractFieldArray { /** * @var Templete */ private $templeteRenderer; /** * Prepare rendering the new field by adding all the needed columns */ protected function _prepareToRender() { $this->addColumn('TextField1', ['label' => __('Custom Label'), 'class' => 'required-entry']); $this->addColumn('TextField2', ['label' => __('Content'), 'class' => 'required-entry']); $this->_addAfter = false; $this->_addButtonLabel = __('Add Row'); } } |
Note: If you are not using existing module, then run the appropriate commands to register your module and necessary dependencies using:-
php bin/magento setup:upgrade
php bin/magento setup:di:compile
Now run the command php bin/magento cache:flush
And check in Magento Admin Panel:-
STORES->Configuration->GENERAL->Bluethink)
Just click and will get the output like below:


Amit Soam
2022-11-02