

Introduction
Running a Java application continuously on an AWS EC2 instance is a common requirement for backend services, APIs, and automation scripts. By using a systemd service, we can ensure that the application starts on boot, restarts on failure, and logs events properly. This guide will walk you through setting up your Java application as a service on an EC2 instance.
Step-by-Step Guide
Step 1: Create a Systemd Service File
First, connect to your AWS EC2 instance using SSH and create a new systemd service file:
|
1 |
sudo nano /etc/systemd/system/denco_xenial.service |
Step 2: Configure the Service File
Add the following configuration:
|
1 2 3 4 5 6 7 8 9 10 11 12 13 14 15 16 17 18 19 20 21 22 23 24 25 26 27 |
[Unit] Description=Denco Xenial EeChanges Java Application After=network.target [Service] User=ubuntu WorkingDirectory=/home/ubuntu ExecStart=/usr/bin/java -jar /home/ubuntu/Denco_Xenial_EeChanges-0.0.1-SNAPSHOT.jar Restart=always StandardOutput=append:/home/ubuntu/denco_xenial.log StandardError=append:/home/ubuntu/denco_xenial-error.log [Install] WantedBy=multi-user.target |
Press CTRL + X, then Y, and hit Enter to save the file.
Step 3: Reload Systemd and Enable the Service
Run the following commands to reload systemd and enable your service:
|
1 2 3 4 5 |
sudo systemctl daemon-reload sudo systemctl enable denco_xenial # Enable auto-start on boot sudo systemctl start denco_xenial # Start immediately |
Step 4: Verify That the Service is Running
To check the status of your Java application, use:
|
1 |
sudo systemctl status denco_xenial |
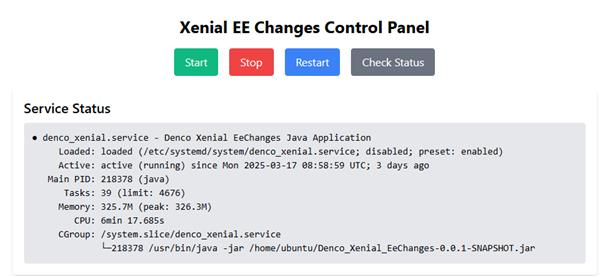
You should see output similar to this:
|
1 2 3 4 5 6 7 8 9 10 11 12 13 14 15 16 17 |
denco_xenial.service - Denco Xenial EeChanges Java Application Loaded: loaded (/etc/systemd/system/denco_xenial.service; enabled; vendor preset: enabled) Active: active (running) since Mon 2025-03-17 08:58:59 UTC; 3 days ago Main PID: 218378 (java) Tasks: 39 (limit: 4676) Memory: 325.7M (peak: 326.3M) CPU: 6min 17.240s CGroup: /system.slice/denco_xenial.service └─218378 /usr/bin/java -jar /home/ubuntu/Denco_Xenial_EeChanges-0.0.1-SNAPSHOT.jar |
Step 5: Manage Your Java Application
Use the following commands to manage your service:
| Action | Command | ||
|---|---|---|---|
| Start App |
|
||
| Stop App |
|
||
| Restart App |
|
||
| Check Status |
|
||
| View Logs |
|
Usage and Benefits
Why Use systemd for Your Java Application?
- Auto-Restart on Failure: Ensures your Java program runs continuously.
- Start on Boot: Your application automatically starts when the EC2 instance boots up.
- Easy Management: Start, stop, and restart your service with simple commands.
- Logging Support: Saves logs to files for debugging and monitoring.
Use Cases
- Running backend services like APIs and database processors.
- Continuous data synchronization jobs.
- Java-based monitoring or automation scripts.
Running the Application Locally
If you want to run the JAR file locally before deploying it to EC2, use:
|
1 |
java -jar Denco_Xenial_EeChanges-0.0.1-SNAPSHOT.jar |
If the application is running successfully, you should see the expected output in your terminal or logs.
Integrating with Web Control Panel
As shown in the screenshots below, a web-based control panel can be created to manage the Java service visually.
Screenshot: Web Control Panel for Service Management
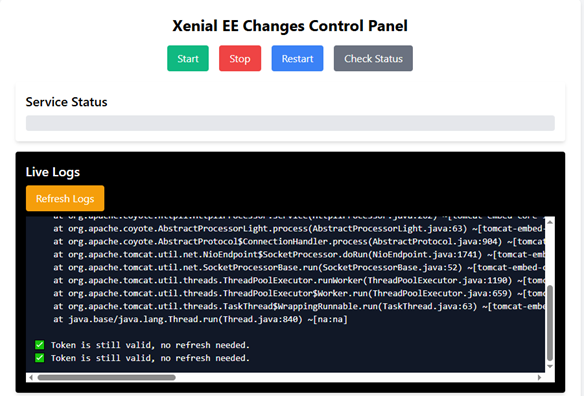
This panel allows users to start, stop, restart, and check the status of the service through a web interface instead of using SSH.
Conclusion
By using systemd, you can ensure that your Java application runs 24/7 on AWS EC2. This method is efficient, reliable, and easy to manage.


bluethinkinc_blog
2025-04-08